Alerts
  • 22 Apr 2024
  • Dark
    Light

Alerts

  • Dark
    Light

Article Summary

View and configure alerts for your vehicles

This page lets you view the different geolocation alerts available in the application and their status for each vehicle: are they configured or not? Are the alert recipients configured or not?

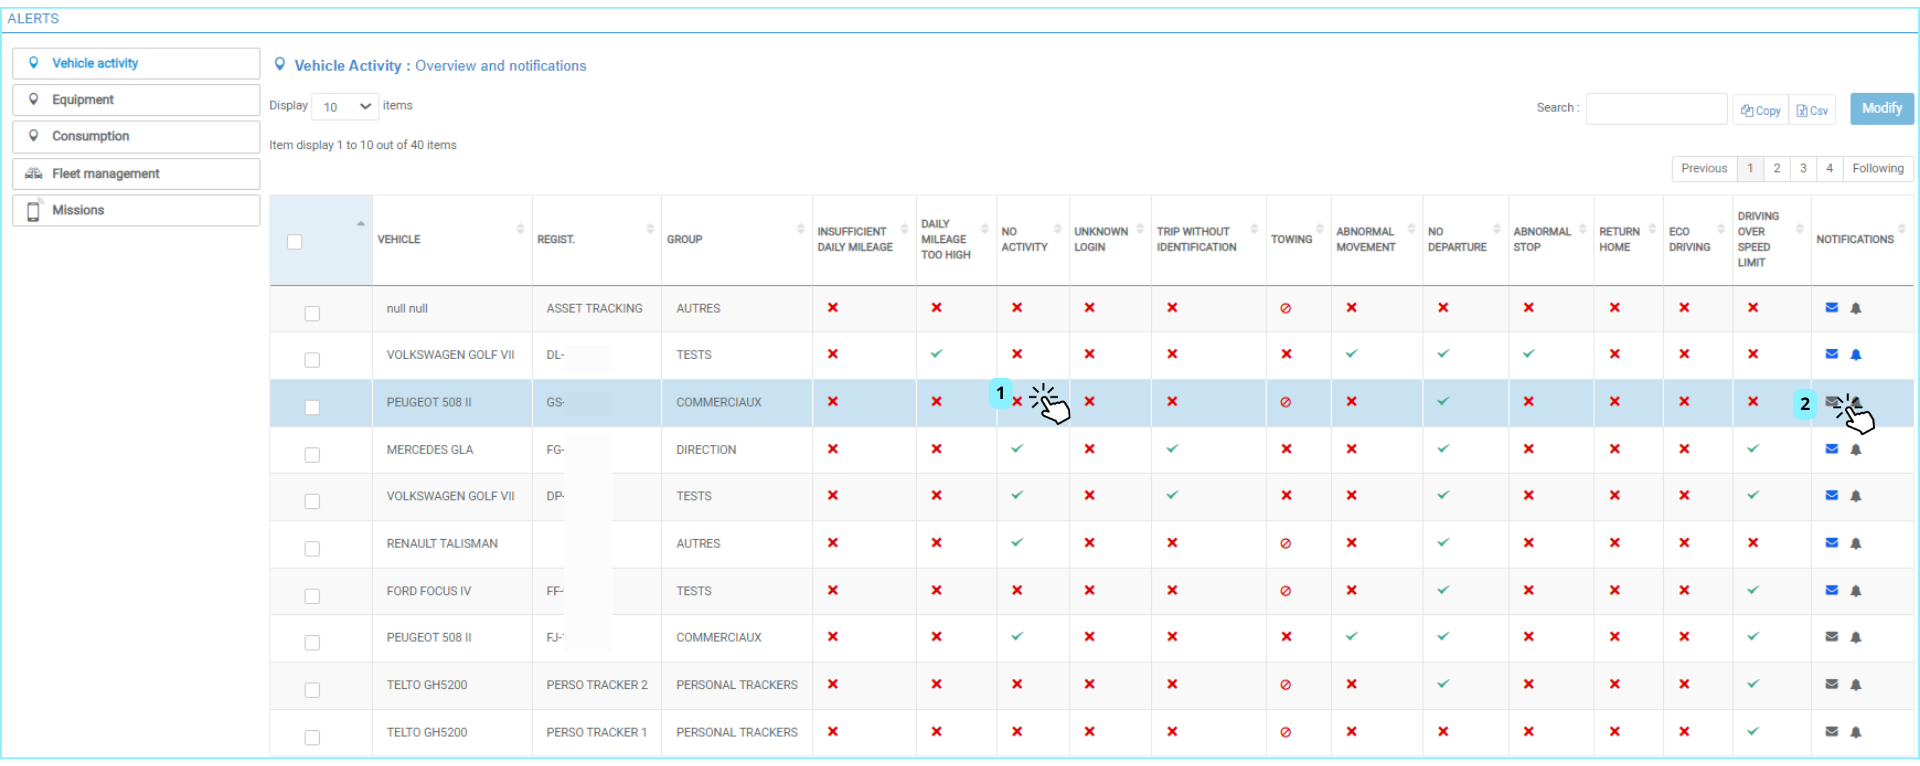
Configure and manage these alerts for each vehicle or group of vehicles.

You can access the history of alerts received in the "History and status" > "Events" menu.

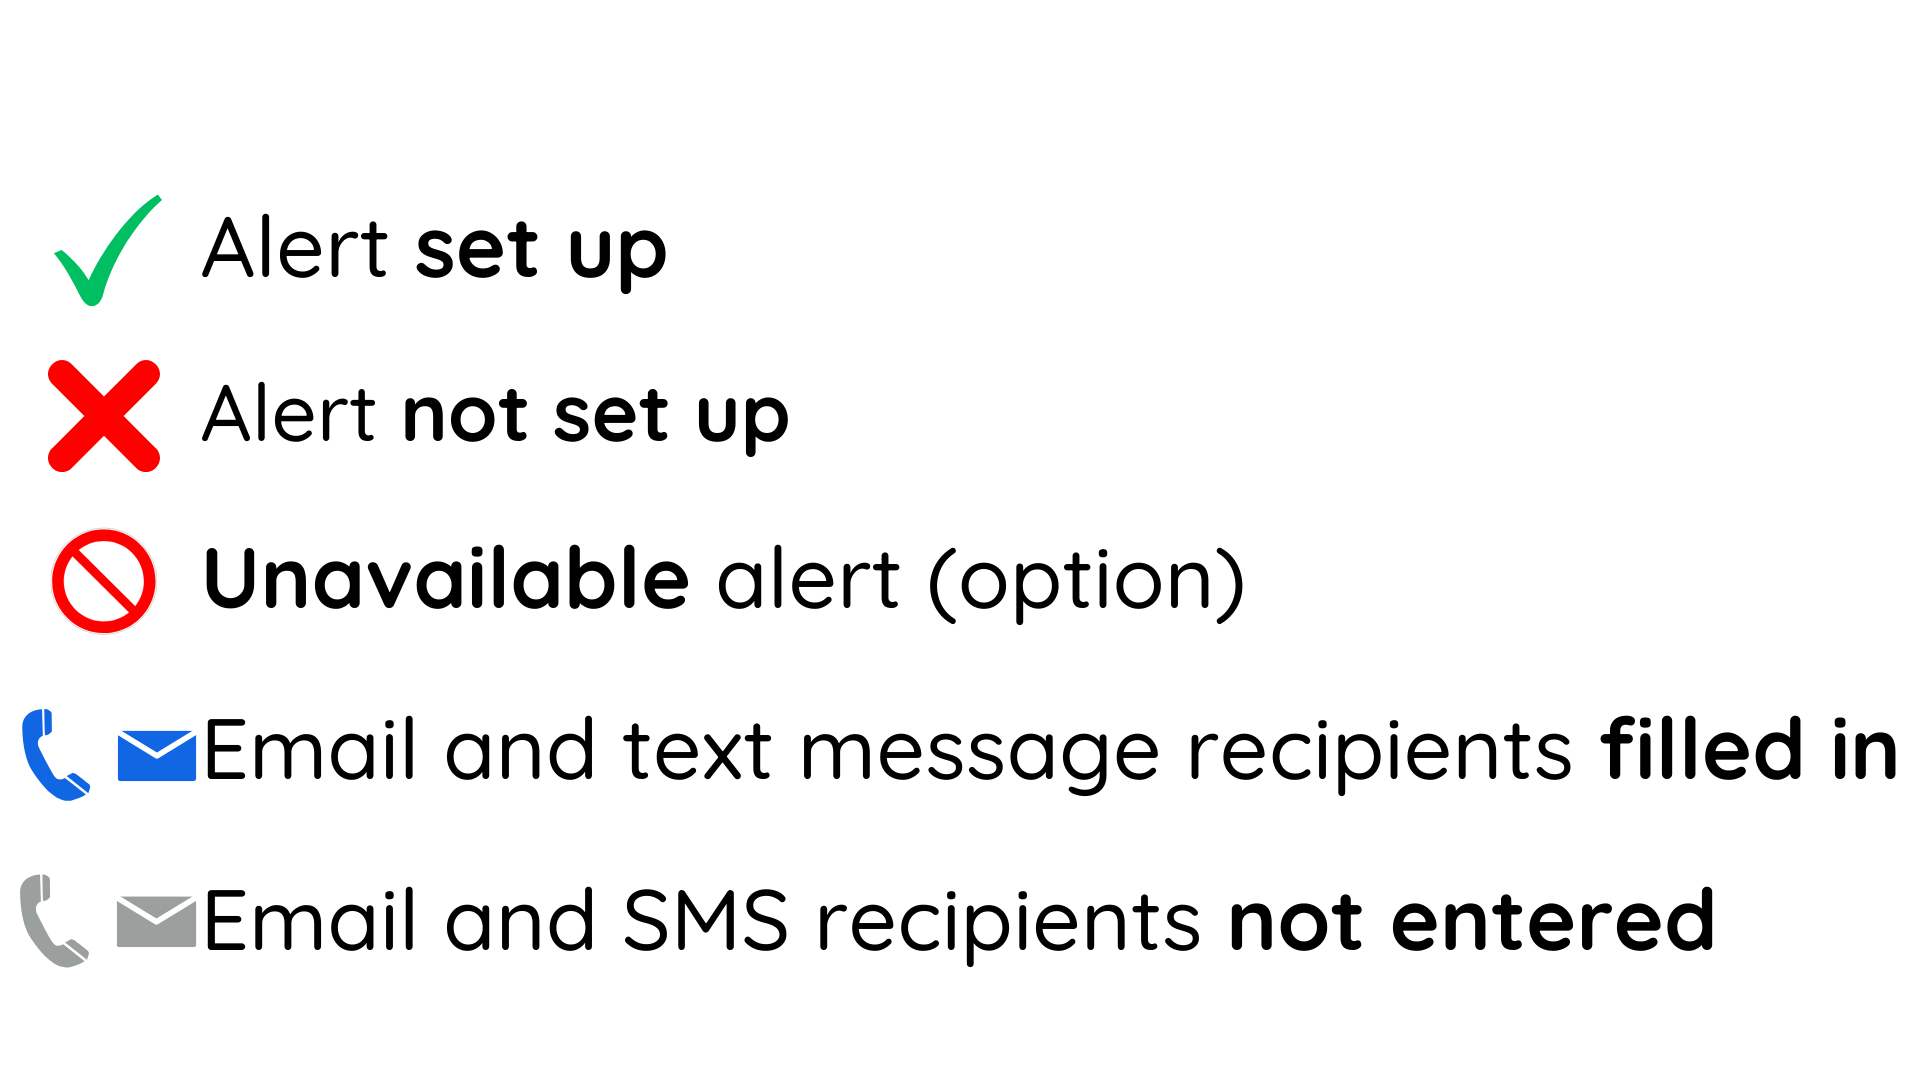
1. Click on ✅ or ❌ to access the details of this alert and configure it.

2. Click to access the recipients of this alert and manage them (add, delete...).

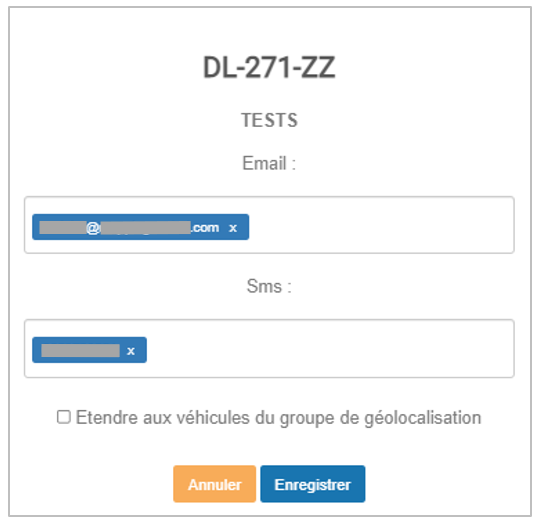
To receive alerts: select at least one email address or mobile number.

Select alert recipients

1. Tick the alert(s) concerned

2. Click on EDIT to open the editing window:

If email addresses or telephone numbers are similar to a maximum of 6 email addresses or 6 similar telephone numbers are retained. The user is still free to modify the various lists.

  • If no email addresses or telephone numbers are entered in the settings, the settings are empty and can be defined by the user.
  • If the email addresses or telephone numbers entered are not similar to the settings are empty and can be defined by the user.
  • When selecting the alert recipient(s), it is possible to define them as the recipient(s) of all alerts for vehicles in the same geolocation group.
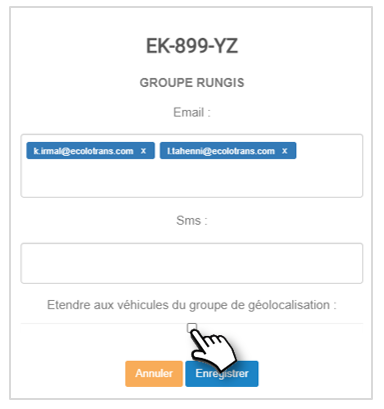
Exemple ici : Groupe Rungis

List of alerts

Activity

Insufficient daily mileage alert

This alert warns you as soon as a vehicle does not cover the minimum daily distance.

This is useful, for example, for vehicles that are obliged to make a round.

This alert is not configured by default. It is up to you to define it, select the vehicles concerned and activate it.

The page displays a list of all your vehicles:

1. A box is ticked for vehicles for which the alert is activated with the minimum distance set.

Configure or modify the alert

2. Tick the vehicles concerned.

3. Click on the MODIFY button.

The alert configuration window appears:

4. The vehicles previously ticked are selected, but you can still select or deselect others if you wish. 

5. Click on the cursor to enable/disable the alert.

6. Set the minimum daily distance that the vehicle(s) must travel.

7. Don't forget to SAVE.

The list will be updated.

Daily mileage too high alert

This alert warns you if a vehicle covers too many kilometres in a day for its intended use.

This alert is not configured by default. It is up to you to define it, select the vehicles concerned and activate it.

The page displays a list of all your vehicles:

1. A box is ticked for vehicles for which the alert is activated with the maximum distance set.

Configure or modify the alert

2. Tick the vehicles concerned.

3. Click on the MODIFY button.

The alert configuration window appears:

4. The vehicles previously ticked are selected, but you can still select or deselect others if you wish. 

5. Click on the cursor to enable/disable the alert.

6. Set the maximum daily distance that the vehicle(s) must travel.

7. Don't forget to SAVE.

The list will be updated.

Inactivity alert

This alert warns you when a vehicle has not been driven for a specific period of time.

This alert can be used, for example, to determine whether certain vehicles are under-used and could be reassigned, made available for car-sharing or removed from the fleet.

This alert is not configured by default. It is up to you to define it, select the vehicles concerned and activate it.

The page displays a list of all your vehicles:

1. A box is ticked for vehicles for which the alert is activated with the number of days of inactivity set.

Configure or modify the alert

2. Tick the vehicles concerned.

3. Click on the MODIFY button.

The alert configuration window appears:

4. The vehicles previously ticked are selected, but you can still select or deselect others if you wish. 

5. Click on the cursor to enable/disable the alert.

6. Set the number of days of inactivity after which you wish to receive the alert.

7. Don't forget to SAVE.

The list will be updated.

Unknown identification alert

This alert notifies you as soon as a Dallas type badge or key has been passed over the reader but has not been saved in the application and is therefore not recognised.

This alert is not configured by default. It is up to you to define it, select the vehicles concerned and activate it.

When the application is initialized, the list is empty:

Configuring or modifying the alert

1. Click on the ADD button to configure the alert.

The alert configuration window appears:

2. Select the vehicles concerned. 

3. Don't forget to SAVE.

The list is updated.

4. If you wish to modify alerts that have already been set up, tick the boxes of the vehicles concerned and click on MODIFY, then return to step 5.

Delete one or more alerts

5. Tick the boxes of the vehicles concerned and click DELETE.

Unidentified journey alert

This alert warns you as soon as a journey has been made by a vehicle whose driver has not identified himself.

This alert is not configured by default. It is up to you to define it, select the vehicles concerned and activate it.

When the application is initialized, the list is empty:

Configuring or modifying the alert

1. Click on the ADD button to configure the alert.

The alert configuration window appears:

2. Select the vehicles concerned. 

3. Don't forget to SAVE.

The list is updated.

4. If you wish to modify alerts that have already been set up, tick the boxes of the vehicles concerned and click on MODIFY, then return to step 5.

Delete one or more alerts

5. Tick the boxes of the vehicles concerned and click DELETE.

Towing alert (suspected theft from flatbed)

This alert warns you as soon as the vehicle is in motion without the ignition having been switched on.

The vehicle may be being towed or placed on a flatbed truck (theft, breakdown or impound...).

This alert is not configured by default. It is up to you to select the vehicles concerned and activate it.

When you initialise the application, the list is empty:

Activate the alert

1. Click on the ADD button to configure the alert.

The alert configuration window appears:

2. Select the vehicles concerned. 

3. Don't forget to SAVE.

The list is updated:

Delete one or more alerts

4. Tick the boxes of the vehicles concerned and click DELETE.

Abnormal movement alert

This alert notifies you as soon as a vehicle moves during one or more monitoring periods that you have configured.

This alert is not configured by default. It is up to you to define it, select the vehicles concerned and activate it.

The page displays a list of all your vehicles:

1. A box is ticked for the vehicles for which the alert is activated. The activation times and days are displayed.

Configure or modify the alert

2. Tick the vehicles concerned.

3. Click on the MODIFY button.

The alert configuration window appears:

4. The vehicles previously ticked are selected, but you can still select or deselect others if you wish. 

5. Click on the cursor to enable/disable the alert.

6. For each day of the week, select the time slot(s) during which monitoring is activated. 

Click on a line to create a slot (period), then stretch the ends.

Double-click on a time slot to delete it.

7. Click to delete all the slots for the day

8. Don't forget to SAVE.

The list is updated.

Non-start alert

This alert warns you if a vehicle has not started at the set time.

This alert is not configured by default. It is up to you to define it, select the vehicles concerned and activate it.

1. The page displays a list of all your vehicles:

2. A box is ticked for vehicles for which the alert is activated.

Configure or modify the alert

3. Tick the relevant vehicles.

4. Click on the EDIT button.

5. The alert configuration window appears:

6. The vehicles previously ticked are selected, but you can still select or deselect others if you wish.

7. Click on the cursor to turn the alert ON/OFF.

8. Determine the time by which the vehicles must have started at the latest (the vehicle must have moved).

9. Select the days of the week on which monitoring is activated.

10. Don't forget to SAVE.

The list is updated.

Abnormal stop alert

This alert warns you as soon as a vehicle stops for more than X minutes, depending on the time set.

This is suitable for vehicles that do not need to stop (or do not need to stop for a short time) as part of their "normal" activity (e.g. snowploughs, sweepers, etc.).

This alert is not configured by default. It is up to you to define it, select the vehicles concerned and activate it.

The page displays a list of all your vehicles:

 1. A box is ticked for the vehicles for which the alert is activated. The start and end times and the activation days are displayed.

Configure or modify the alert

2. Tick the relevant vehicles.

3. Click on the EDIT button.

The alert configuration window appears:

4. The vehicles previously ticked are selected, but you can still select others or deselect them if you wish. 

5. Click on the cursor to turn the alert ON/OFF.

6. Determine the duration of the stop after which you wish to receive an alert.

7. Select the time slot during which monitoring is activated. To do this, click on the start time and drag to the end time: a blue zone is displayed: the alert is activated during this period. The time slot is displayed next to the day of the week in question.

8. Click on this button to permanently deactivate this alert without having to set the times.

9. Select the days of the week on which monitoring is activated.

10. Don't forget to SAVE.

Return home alert

This alert warns you as soon as a vehicle returns to its driver's home at an "abnormal" time.

This is suitable for vehicles/drivers that are supposed to be on building sites or in the field and not at home.

This alert is not configured by default. It is up to you to define it, select the vehicles concerned and activate it.

The page displays a list of all your vehicles:

1. A box is ticked for vehicles for which the alert is activated.

Configure or modify the alert

2. Tick the relevant vehicles.

3. Click on the EDIT button.

The alert configuration window appears:

4. The vehicles previously ticked are selected, but you can still select others or deselect them if you wish. 

5. Click on the cursor to turn the alert ON/OFF.

6. Select the time before which the vehicle is not expected to return home. 

7. Select the home address from the address book. Enter the first few letters of the name and select the address from the drop-down menu.

8. Select the days of the week on which monitoring is activated.

9. Don't forget to SAVE.

The list is updated.

Eco-driving alert

This alert warns you as soon as a driver performs a certain number of events (sudden braking, violent acceleration or sharp bends) that affect their driving and potentially their safety and running costs.

This alert is not configured by default. It is up to you to define it, select the vehicles concerned and activate it.

The page displays the list of vehicles for which the alert is activated:

1. The number of events selected and a box (checked or unchecked) for buzzer activation are shown in the table.

Configure or modify the alert

2. For initial activation, click on ADD.

3. For a CHANGE, tick the vehicle(s) concerned.

4. Click on the EDIT button.

The alert configuration window appears:

5. Select the vehicles concerned (already ticked if modified). 

6. Select the number of events from which the alert will be notified.

7. Select the period during which the number of events must be reached to notify the alert (in this example: the alert will be notified if 10 events are detected in 5 minutes).

8. Tick the box if you want the buzzer to sound in the vehicle (requires prior installation of a buzzer).

9. Don't forget to SAVE.

The list is updated.

Delete the alert: tick the boxes for the vehicles concerned and click DELETE.

Maximum speed alert

This alert warns you as soon as a vehicle exceeds a set speed for a certain period of time.

This alert is suitable, for example, if you want to receive a warning when a vehicle exceeds 130 km/h. This is a speed set independently of the road on which they are travelling.

This alert is not configured by default. It is up to you to define it, select the vehicles concerned and activate it.

When the application is initialised, the list is empty:

Configure or modify the alert

1. Click on the ADD button to configure the alert.

The alert configuration window appears:


Une image contenant texte, capture d’écran, logiciel, Icône d’ordinateur

Description générée automatiquement

2. Select the vehicles concerned.

3. Set the speed at which you want to receive the alert.

4. Determine the length of time over the speed limit above which you wish to receive the alert. In this example: the alert will be sent as soon as the vehicle is driven for more than 20 seconds at 135 km/h or more.

5. Don't forget to SAVE.

6. The list is updated with the monitored speed:

7. If you wish to modify alerts that have already been set up, tick the boxes for the vehicles concerned and click on MODIFY, then return to step 5.

Delete one or more alerts

8. Tick the boxes of the vehicles concerned and click on DELETE.

 Hardware

OBD box pull-out alert

This alert warns you as soon as the OBD box has been disconnected. You will no longer be able to locate the vehicle or receive data.

This alert is activated by default on all 24/7 vehicles. It does not require any configuration on your part to be operational, except for the email addresses and/or mobile phone numbers of the recipients.

The page displays the list of vehicles concerned.

 Modify alert

1. Tick the relevant vehicles.

2. Click on the EDIT button.

The alert configuration window appears.

3. The vehicles previously ticked are selected, but you can still select others if you wish. 

4. You can deactivate this alert for specific times: to do this, click on the start time and drag to the end time: a grey area will appear: the alert is deactivated for this period. Repeat as many times as necessary. The period is displayed next to the day of the week concerned.

5. Click on this button to permanently deactivate this alert without having to set the times.

6. Don't forget to SAVE.

Abnormal temperature alert

This alert warns you as soon as a monitored temperature falls outside the authorised range. Monitoring can be deactivated outside working hours (evenings and weekends, for example).

This alert is activated by default 24/7 on vehicles fitted with sensors. It does not require any configuration on your part to be operational, except for the email addresses and/or mobile phone numbers of the recipients.

The page displays the list of vehicles concerned:

 1. Tick the relevant vehicles.

2. Click on the EDIT button.

The alert configuration window appears:

3. The vehicles previously ticked are selected, but you can still select others or deselect them if you wish. 

4. You can deactivate this alert for specific times: to do this, click on the start time and drag to the end time: a grey area will appear: the alert is deactivated for this period. Repeat as many times as necessary. The period is displayed next to the day of the week concerned.

5. Click on this button to permanently deactivate this alert without having to set the times.

6. Don't forget to SAVE.

The list is updated. 

You can define a delay after which an abnormal temperature alert (i.e. exceeding the minimum and maximum thresholds set) is triggered. This is to avoid receiving so-called "false positive" alerts when the Bluetooth link is temporarily broken, for example.

Temperature sensor disconnection

These are temperature sensor disconnection or unpairing alerts. If no temperature is detected by the box, this triggers an alert. ATTENTION: if there is a time delay for setting an alert, it must be activated to activate the alert. If no time delay is required, enter 0min.

Une image contenant texte, capture d’écran, Police

Description générée automatiquement

Power loss alert

This alert warns you as soon as the box is disconnected from the battery. You will no longer be able to locate the vehicle or receive data.

This alert is activated by default on all 24/7 vehicles. It does not require any configuration on your part to be operational, except for the email addresses and/or mobile phone numbers of the recipients.

Alert cannot be modified

Unsynchronised box alert

This alert will be triggered if a box has not been communicating with the platform for x amount of time. 

In the alerts module, "Hardware" tab, a new link "Out of sync box" is displayed, and a new column "Out of sync box" is displayed in the global view. 

The column shows the list of vehicles concerned and the status of the alert (activated or not ).

When you click on the "Device not synchronised" link, the alert settings page opens and displays a list of all the vehicles in the fleet, in a table containing the following information:

  • Vehicle
  • Registration
  • Geolocation group to which the vehicle is attached
  • Alert status, i.e. deactivated or activated
  • Number of days without communication from the box before the alert is triggered.

Modify alert 

  1. Tick the box(es) for the vehicle(s) concerned
  2. Click on "Modify
  3. A window for modifying the settings opens, as shown below: 

4. By default, the alert is deactivated. If you set the switch to "Active", a new field is displayed

5. Define the number of days without communication from the box

6. Once the alert has been activated, it will be sent by email to the recipient indicated in the global view of hardware alerts and a notification will be displayed in the notifications ribbon.

7. Don't forget to SAVE. 

Information
You can also access the alert configuration window by clicking on the little red cross or the green check in the column dedicated to the "Box not synchronised" alert in the global view of hardware alerts.

Door opening alert

This alert warns you as soon as a vehicle door is opened. This applies in particular to vehicles carrying valuable equipment that remains in the vehicle at all times. Surveillance can be activated outside working hours (evenings and weekends, for example).

This alert is deactivated by default on all 24/7 vehicles. By selecting the vehicles concerned, you can choose the time slots during which you consider a door opening to be suspicious or abnormal. 

The page displays the list of vehicles concerned:

Modify alert

1. Tick the relevant vehicles.

2. Click on the EDIT button.

The alert configuration window appears:

3. The vehicles previously ticked are selected, but you can still select others or deselect them if you wish. 

4. You can deactivate this alert for specific times: to do this, click on the start time and drag to the end time: a grey area will appear: the alert is deactivated for this period. Repeat as many times as necessary. The period is displayed next to the day of the week concerned.

5. Click on this button to permanently deactivate this alert without having to set the times.

6. Don't forget to SAVE.

A report generation function is also available, as this new alert has been added to the report on material events.

Consumption

Fuel theft alert

This alert warns you as soon as a drop of more than 10% or 8 litres of fuel has been detected when the vehicle is stationary.

This alert is not configured by default. It is up to you to define it, select the vehicles concerned and activate it.

Vehicles must be fitted with a CAN box or Fuel Control sensors.

When the application is initialised, the list is empty:

Configure or modify the alert

1. Click on the ADD button to configure the alert.

The alert configuration window appears:

Une image contenant capture d’écran, ligne

Description générée automatiquement

2. Select the vehicles concerned. 

3. Don't forget to SAVE.

The list is updated: 

4. If you wish to modify alerts that have already been set up, tick the boxes for the vehicles concerned and click on MODIFY, then return to step 5.

Delete one or more alerts

5. Tick the boxes of the vehicles concerned and click on DELETE.

Fuel warning

Vehicles must be fitted with a CAN box or Fuel Control sensors.

This alert warns you as soon as an increase of more than 10% or 8 litres of fuel has been detected when the vehicle is stationary.

This alert is not configured by default. It is up to you to define it, select the vehicles concerned and activate it.

When the application is initialised, the list is empty:

Configure or modify the alert

1. Click on the ADD button to configure the alert.

The alert configuration window appears:

2. Select the vehicles concerned. 

3. Don't forget to SAVE.

The list is updated.

4. If you wish to modify alerts that have already been set up, tick the boxes for the vehicles concerned and click on MODIFY, then return to step 5.

Delete one or more alerts

5. Tick the boxes of the vehicles concerned and click on DELETE.

Low fuel warning

Vehicles must be fitted with a CAN box or Fuel Control sensors.

This alert warns you as soon as the threshold of 10% or 8 litres of fuel remaining in the tank has been detected.

This alert is not configured by default. It is up to you to define it, select the vehicles concerned and activate it.

When the application is initialised, the list is empty:

Configure or modify the alert

1. Click on the ADD button to configure the alert.

The alert configuration window appears:

2. Select the vehicles concerned. 

3. Don't forget to SAVE.

The list is updated:

4. If you wish to modify alerts that have already been set up, tick the boxes for the vehicles concerned and click on MODIFY, then return to step 5.

Delete one or more alerts

5. Tick the boxes of the vehicles concerned and click on DELETE.

Low battery warning (electric or hybrid vehicles) 

This alert lets you know when your vehicle, whether hybrid or electric, has reached a battery threshold defined by you (between 5% and 50%). 

Configure or modify the alert

1. Click on the ADD button to configure the alert.

The alert configuration window appears:

Select the vehicle(s) concerned and the threshold decided. Don't forget to SAVE.

 If you wish to modify alerts that have already been set up, tick the boxes for the vehicles concerned and click on MODIFY. 

To delete alerts that have already been set up, tick the boxes for the vehicles concerned and click DELETE.

Fleet Management

Park monitoring

These alerts keep you informed about your entire fleet, including driving laws, renewals, servicing, abnormal consumption, vehicle non-returns, mileage updates, contract terminations and ANTAI.

To update your preferences and activate/deactivate alerts, click on MODIFY. A new window with the various alerts will open.
Une image contenant texte, capture d’écran, ligne, nombre

Description générée automatiquement

In the example of the rolling law, you can determine whether this alert applies to the whole fleet or to the assignment centres concerned, whether there are reminders (daily/weekly/monthly), who to notify by e-mail and on the mobile application, and finally the list of e-mails concerned.

Missions

Mission not started alert

This alert warns the supervisor and agent if a mission has not started 20 minutes after the scheduled time.

This alert is deactivated by default. You therefore need to activate it for the agents concerned.

The page displays the list of agents concerned and the status of the alert (activated or not).

Modify alert

1. Click on the MODIFY button.

2. Select the alert concerned.

3. The alert configuration window opens.

4. Select the agents concerned.

5. Enter the email addresses and mobile numbers of the people to whom the alerts will be sent.

6. Tick the box if you want the group supervisor to be informed as well.

7. Don't forget to SAVE.

Mission not completed alert

This alert warns the supervisor and the agent if a mission has not been completed 20 minutes after the theoretical scheduled time.

This alert is deactivated by default. It must therefore be activated for the agents concerned.

The page displays the list of agents concerned and the status of the alert (activated or not ).

Modify alert

1. Click on the MODIFY button.

2. Select the alert concerned

3. The alert configuration window opens.

4. Select the agents concerned.

5. Enter the email addresses and mobile numbers of the people to whom the alerts will be sent.

6. Tick the box if you want the group supervisor to be informed as well.

7. Don't forget to SAVE.

Alert for non-compliance with tour timetable

This alert lets you know as soon as a job has not been processed in the established timeframe.

It is sent when the report for mission M+1 is recorded but the report for mission M has not been completed.

This alert is deactivated by default. You therefore need to activate it on the agents concerned.

The page displays the list of agents concerned and the status of the alert (activated or not ).

Modify alert

1. Click on the MODIFY button. 

2. Select the alert concerned

3. The alert configuration window opens.

4. Select the agents concerned.

5. Enter the email addresses and mobile numbers of the people to whom the alerts will be sent.

6. Tick the box if you want the group supervisor to be informed as well.

7. Don't forget to SAVE.

List of assignments: reports completed too early appear in orange.

It is therefore possible to view the assignments carried out in the wrong chronology:


Tuto