Setting
- 30 Jan 2025
- Print
- DarkLight
- Download PDF
Setting
- Updated on 30 Jan 2025
- Print
- DarkLight
- Download PDF
Article summary
Did you find this summary helpful?
Thank you for your feedback!
General parameters
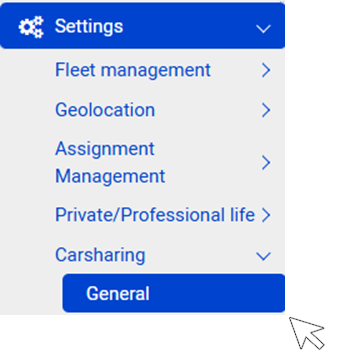
The parameters configured on this page will impact the global carsharing service, will be valid for all carsharing pools, for all vehicles and for all users.
Other parameters can be configured on the car-sharing pools (see following pages) or on the vehicle file (vehicle opening mode) or on the employee file.
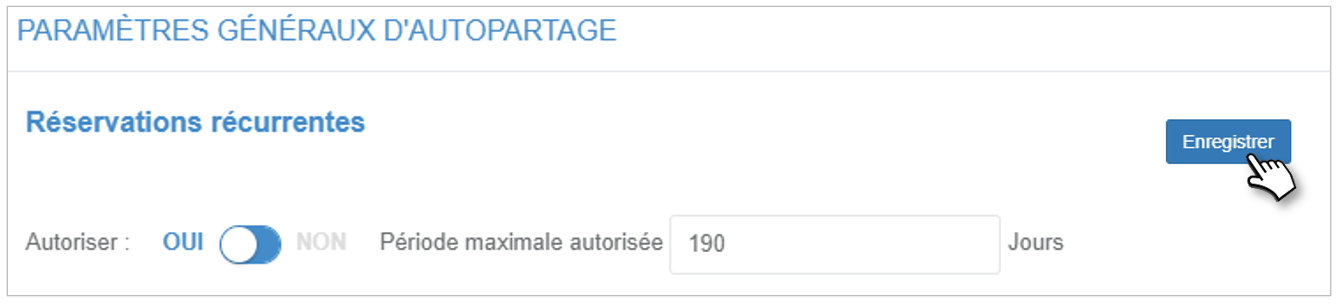
Recurring Reservations
The maximum recurrence is 999 days.
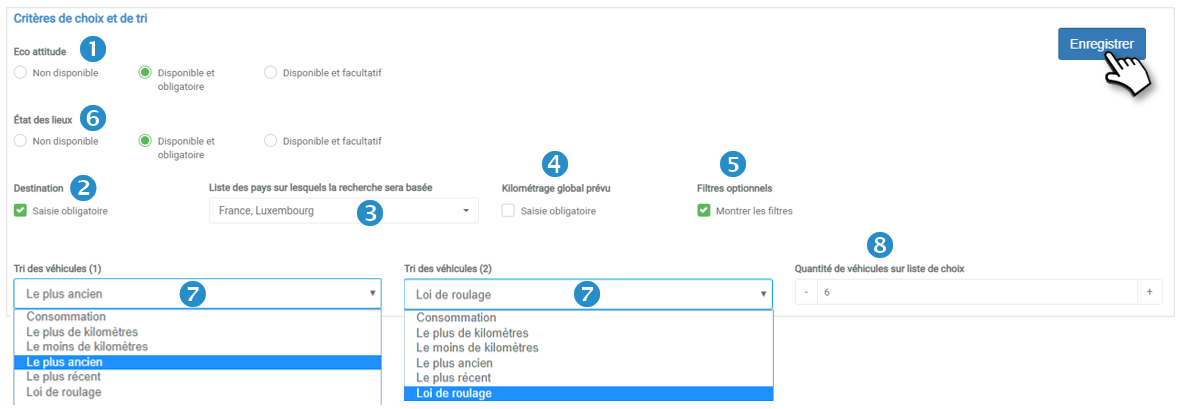
Selection and sorting criteria
1. Eco-attitude: The vehicles offered to drivers are primarily those with the lowest or zero CO2 emissions (electric vehicles).
- NO : no sorting
- Mandatory: forced sorting
- Free : left to the choice of the reservee
Address book points can now be used as a destination in car-sharing vehicle reservations. As a first step, the manager needs to define the address book groups that can be used for this feature.
Destination
2. Check to make it mandatory for the reservee to enter the destination
List of countries
3. Check the countries in which you will be using carsharing to help locate the addresses.
Total mileage expected
4. Check to make it mandatory to enter the expected mileage (allows you to suggest certain categories of vehicles depending on the distance to be covered)
Optional filters
5. Choose to display or not the optional filters (other criteria)
Tabs of inventory of fixtures
6. Choose whether or not to make the inventory of fixtures available/obligatory (the obligation allows, for example, to force drivers to indicate the parking spot of the vehicle)
- NOT AVAILABLE: do not display the inventory tabs in the reservation details of a vehicle (platform and application).
- AVAILABLE AND MANDATORY: display the inventory tabs by making the entry of the exit condition mandatory. (the manager is not concerned by this obligation)
- AVAILABLE AND OPTIONAL: display the inventory of fixtures tabs while making the entry of the exit inventory of fixtures optional.
Sorting of vehicles (1) and (2)
7. Select the criteria for sorting the vehicles that will be proposed to users.
For example: here, the oldest vehicles will be proposed in priority, followed by those with a driving law that is most in line with the initial contract.
Quantity of vehicle on choice list
8. Choose the maximum number of vehicles to propose to the bookers according to their selection criteria
Type of mission
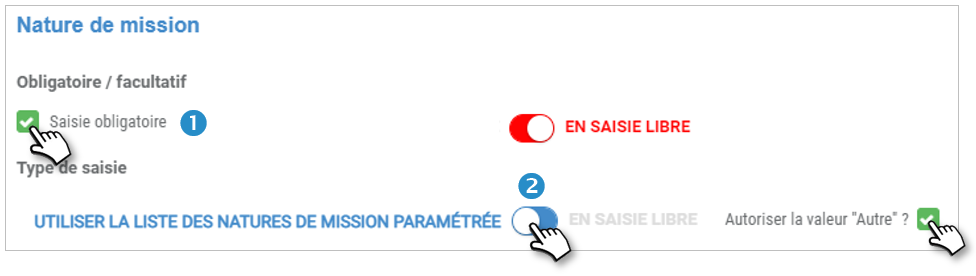
In the reservation form, you can make it mandatory to enter or select the reason for the reservation.
1. Check to make the nature of the mission mandatory, i.e. the reason for the reservation (allows the logbook to be filled in automatically).
2. Select the type of entry:
- LIST: the driver will have to select a reason from the drop-down list.
- "Other": check if you wish to activate the "Other" option and the free entry of another reason.
- FREE ENTRY: The driver enters the reason for the reservation himself.
Reservation period in advance
Define the maximum time upstream to make a reservation.
Maximum and minimum durations
Define the maximum and minimum duration of a reservation.
Re-opening delay
Define the period of access to the vehicle after return (if you forget something in the vehicle for example).
Inter-booking time
Define the minimum time between two reservations.
Delayed return alert
Define the time after which the late drop-off alert should be sent to the manager (example: the alert will be sent 20 minutes after the scheduled end of the reservation).
Vehicle not available alert timer
Define the time after which the non-return alert will be sent to the next booker (H of end of reservation + X minutes)
Access time before reservation
Define the time period during which you allow access to the vehicle BEFORE the reservation begins.
Time to enter the inventory of fixtures and incidents after the reservation
Set the maximum amount of time users can fill out forms.
Maximum duration before validation for long reservations
Define the maximum number of days allowed for the reservation without validation.
Beyond this number of days, the reservation will go into validation workflow.
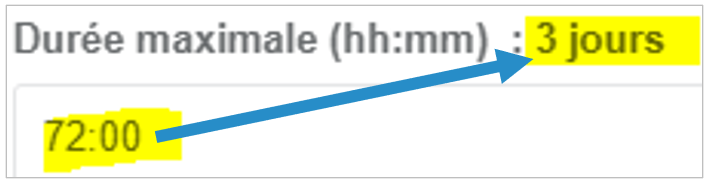
Attention
Enter the values in hours and minutes, the application will convert them into labels:
Inter-booking for electric vehicles
This period of immobilization of electric vehicles before each reservation allows the battery to be charged for the planned trip.
The manager has two options:
- 1. No downtime: The inter-booking time (1) will be added before each reservation of an electric vehicle via Carsharing. The inter-booking time cannot be less than the "Access time before booking".

- 2. Duration depending on the recharge: The duration of the vehicle's immobilization is calculated according to the power of the charging stations (4), the distance covered during the journey and the vehicle's consumption.
If the calculated downtime is less than the inter-booking time, then the inter-booking time is applied. Otherwise, the immobilization time prevails.
Power of the charging stations
The power of the charging stations is defined either in the carsharing pool parameters or in the general carsharing parameters (default value and modifiable) if the pool parameter is not present.
Calculation of the inter-reservation period
The calculation of the inter-booking time is based on 3 data:
- The distance planned at the time of the reservation
- The average consumption of the vehicle
- The power of the charging stations

Conditions before booking
When the user clicks to choose a vehicle, the application may display a thumbnail with preconditions (1 to 3) that the user must validate (check) before reserving the vehicle:
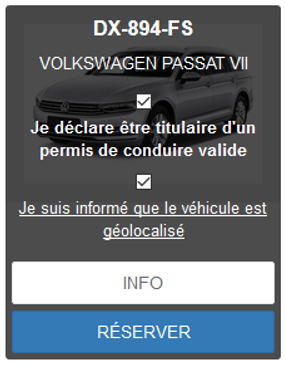
This can be a declaration that you have a valid driver's license, that you have read and accepted the internal rules and regulations, or any other commitment that you deem useful.
You can also make documents available for download.
1. Enter the text that will appear in the thumbnail:
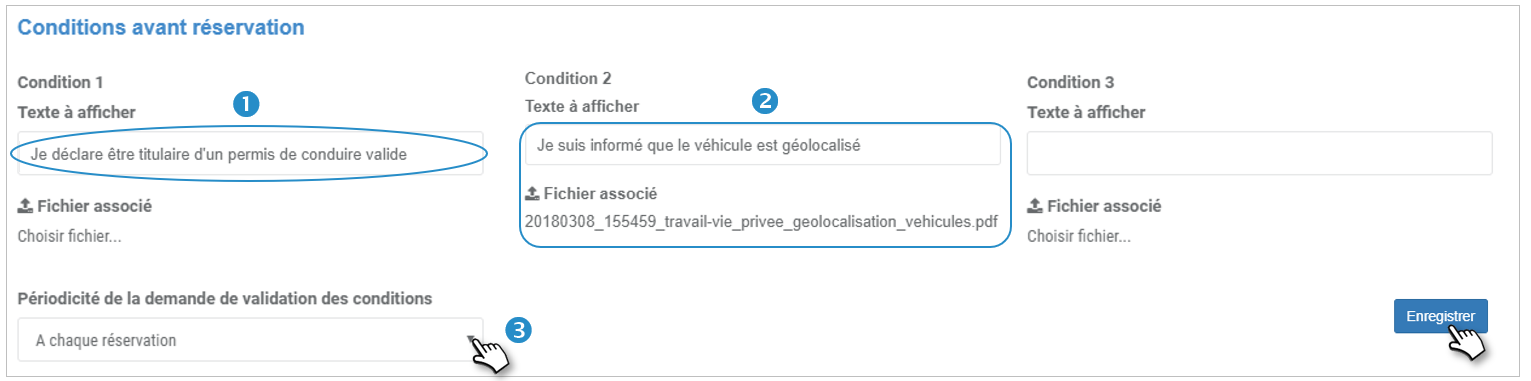
2. Download the file to be consulted (optional)
Reproduce up to 3 conditions.
3. Select the frequency of display of the T&Cs: systematic, daily, weekly.....
(Each time the conditions are modified, acceptance will be mandatory).
Carpooling management
Concerns carpooling with carsharing vehicles:
1. Set the search radius for the requests.
2. Check if you want users to change the radius.
3. Set a time tolerance range for carpool start/end times for carpool reservation searches.
4. Check if you want the pools to appear as trip start and finish times.
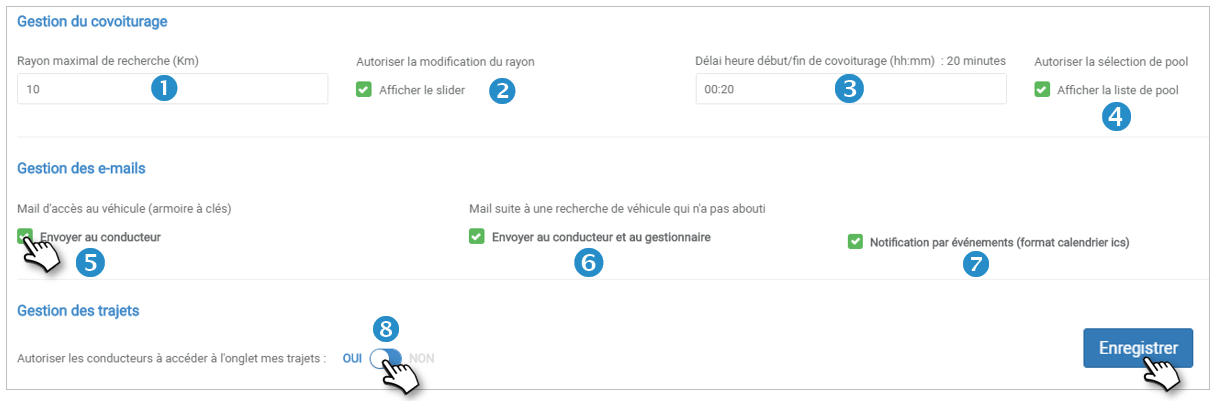
Email management
Check the corresponding box if you want an email to be sent in these 2 cases:
5. CONCERNING KEY BOXES ONLY: The application sends an additional email to the driver (in addition to the reservation confirmation email) containing the opening code.
6. Unsuccessful vehicle search: The application sends an email to the driver and the manager when a driver has tried to make a reservation but has not been offered a vehicle.
7. Sending a calendar notification in .ics format for each event (creation, modification, deletion)
Journey management
By default, users can see their car-sharing trips in the application.
8. Set the slider to NO, if you do not want this.
Pool management
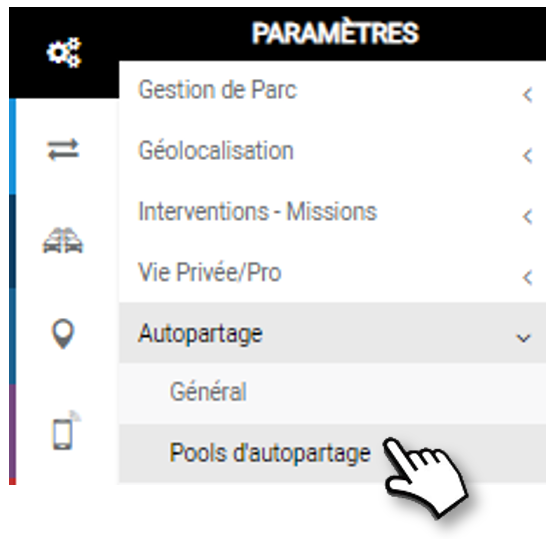
Operating principles :
- A vehicle can only be offered for reservation if it is in a pool
- Drivers may only have access to certain pools
This is why you need to organize and structure the list of vehicles in order to be able to select, display statistics or authorize employees to access certain pools.
You will find this tree structure in all the menus/services that propose the selection of pools: statistics, alerts, reports ....
Step 1/3: Creating the pool tree
Organize and create as many pools as you want according to your internal organization.
1. Place your cursor over "My Carsharing Pools" and click NEW to create a pool. Click NEW and you will create a sub-pool.
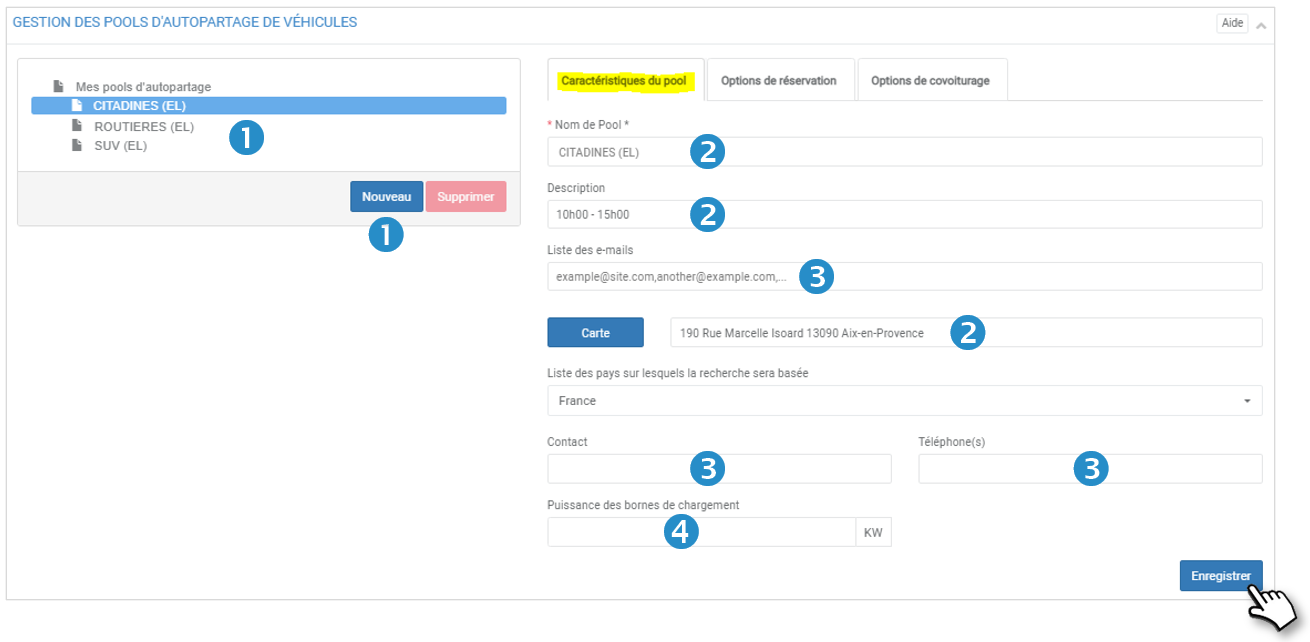
2. Enter a name for this pool and fill in the characteristics of this pool, its location and do not forget to SAVE.
Info
You can move one group into another by clicking on the group to be moved and dragging and dropping it into the new group.
3. List of emails, contacts and phones:
The emails entered in this field will receive alerts related to this Pool. Separate the addresses with ', '.
4. Power of the charging stations
It allows you to add the charging power of the charging stations used by the customer to charge his electric vehicles. This data will be used in the calculation of the inter-booking time.
Info
If you don't have any pool, you can import the tree of your geolocation groups or assignment centers and the distribution of your vehicles by clicking on the button IMPORT.
You can move a pool into another pool by clicking on the pool to be moved and dragging and dropping it into the new pool.
You can move a pool into another pool by clicking on the pool to be moved and dragging and dropping it into the new pool.
In the other 2 tabs, define the reservation and carpooling options:
Reservation options
1. Choose whether reservations should be subject to prior approval by the line manager (WITH or WITHOUT workflow).
2. Choose if the reservations start automatically when the key is taken from the key cabinet or when the vehicle door is opened (in the case of opening by badge or by mobile application), or if the user must manually start his reservation (on the web or mobile application) if he collects the vehicle key from a board or from a reception desk for example.
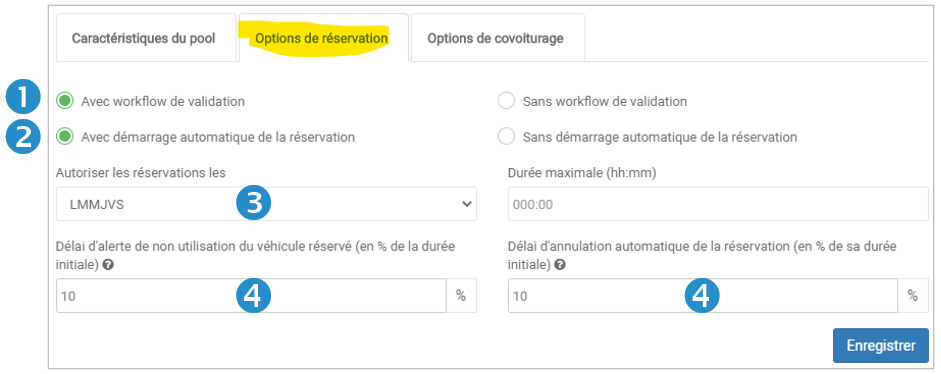
3. Choose if reservations are allowed only on working days (MTWTF) or all week (MTWTFSS) or on working days + Saturday and Sunday if these days are in the middle of the reservation period (e.g. Thursday to Tuesday)
4. Set the alert time for no-show (in % of the reservation time) and automatic reservation cancellation.
Carpooling options
1. PROPOSE carpooling: bookers will have the choice to carpool or reserve a vehicle

2. MANDATORY: the bookers must take carpoolers who make the same trip
Step 2/3: Assigning vehicles to pools
This part allows you to manage the vehicles within each pool: add or remove them.
Add vehicle(s) to a pool:
1. Select the relevant pool (highlighted)
2. In the left column (All vehicles): check the boxes of the concerned vehicles and click on the 'ADD' button or click on the blue arrows of the concerned vehicles.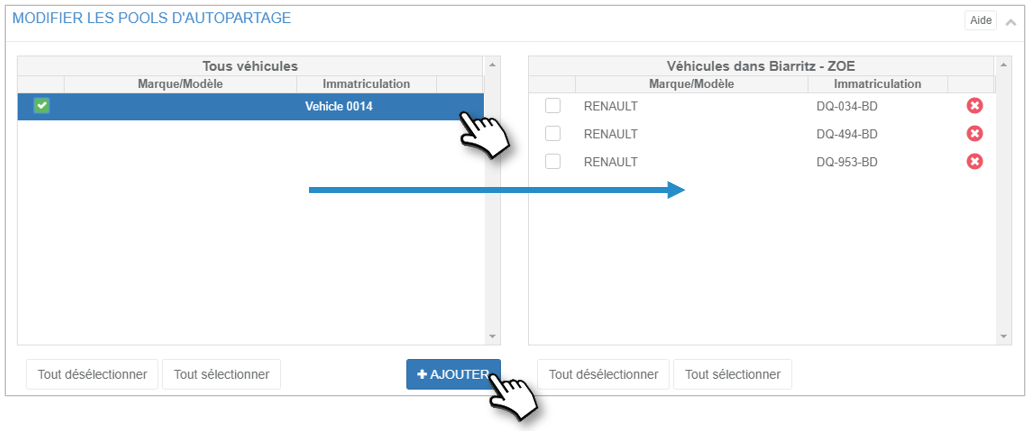
3. Vehicles will move from the left column to the right column in the relevant pool.
4. No need to validate or save, the action is immediate.
Remove vehicle(s) from a pool:
1. Select the relevant pool (highlighted)
2. In the right column (concerned pool): check the boxes of the concerned vehicles and click on the button 'DELETE' or click on the red crosses of the concerned vehicles.
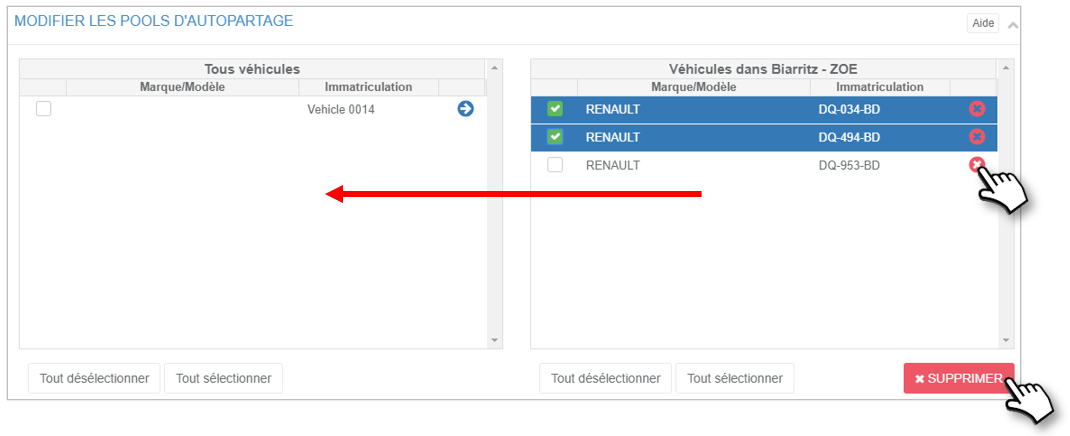
3. The vehicles will move from the right column to the left column (All vehicles).
4. No need to validate or save, the action is immediate.
Info
The vehicles are not "deleted", they are switched to the general list of vehicles, which cannot be reserved.
Step 3/3: Exceptions for drivers in validation workflow
This part allows you to exempt some drivers from the validation of their reservation in a validation workflow
Prerequisite: Pool with validation workflow
Objective: exempt some drivers from the validation workflow of their automatically confirmed reservation
Exempt driver(s) from validation:
1. Select the relevant pool (highlighted)
2. In the left column (Drivers WITH workflow): check the boxes of the drivers concerned and click on the 'ADD' button or click on the blue arrows of the drivers concerned.
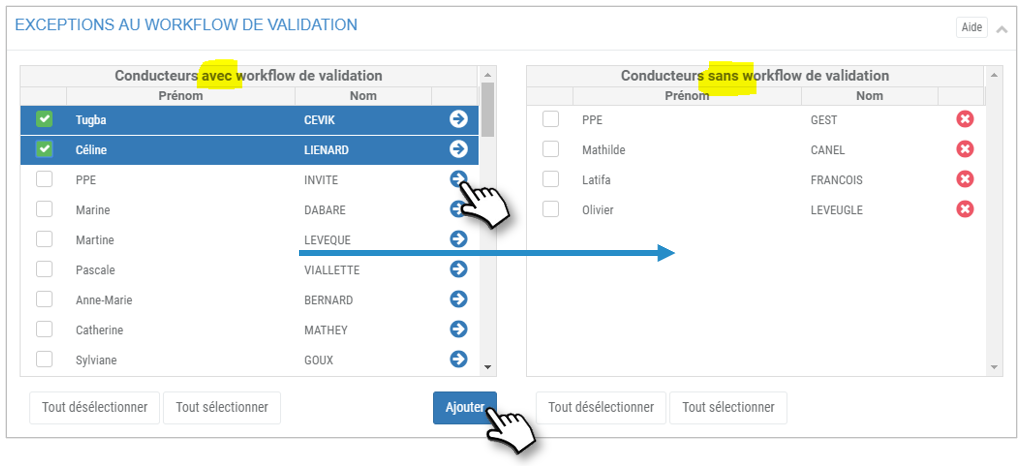
3. The drivers will move from the left column to the right column with the drivers WITHOUT workflow.
4. No need to validate or save, the action is immediate.
Remove exemption from driver(s):
1. Select the relevant pool (highlighted)
2. In the right column (Drivers WITHOUT workflow): check the boxes of the drivers concerned and click on the 'DELETE' button or click on the red crosses of the drivers concerned.
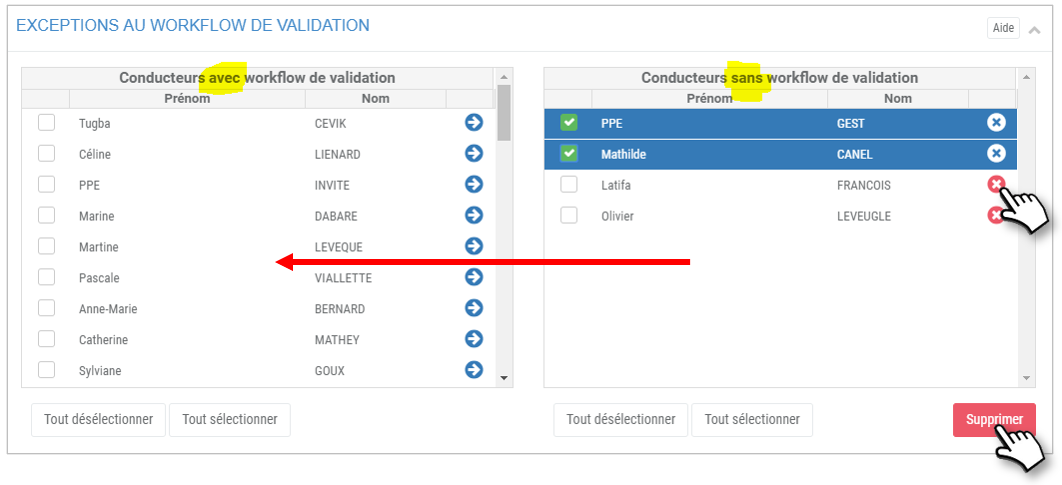
3. The drivers will move from the right column to the left column with the drivers WITH workflow.
4. No need to validate or save, the action is immediate.
Assigning Pass badges
A Pass badge allows you to take a vehicle without a reservation
This section allows you to assign Pass badges to one or more vehicle pools
Assign one or more badges:
1. Select the relevant pool (highlighted)
2. Click on the Pass Badges tab
3. In the left column (unassigned PASS badges): check the boxes of the concerned badge(s) and click on the 'ADD' button or click on the blue arrows of the concerned badges.
4. The badges will move from the left column to the right column with the pool badges.
Don't forget to SAVE
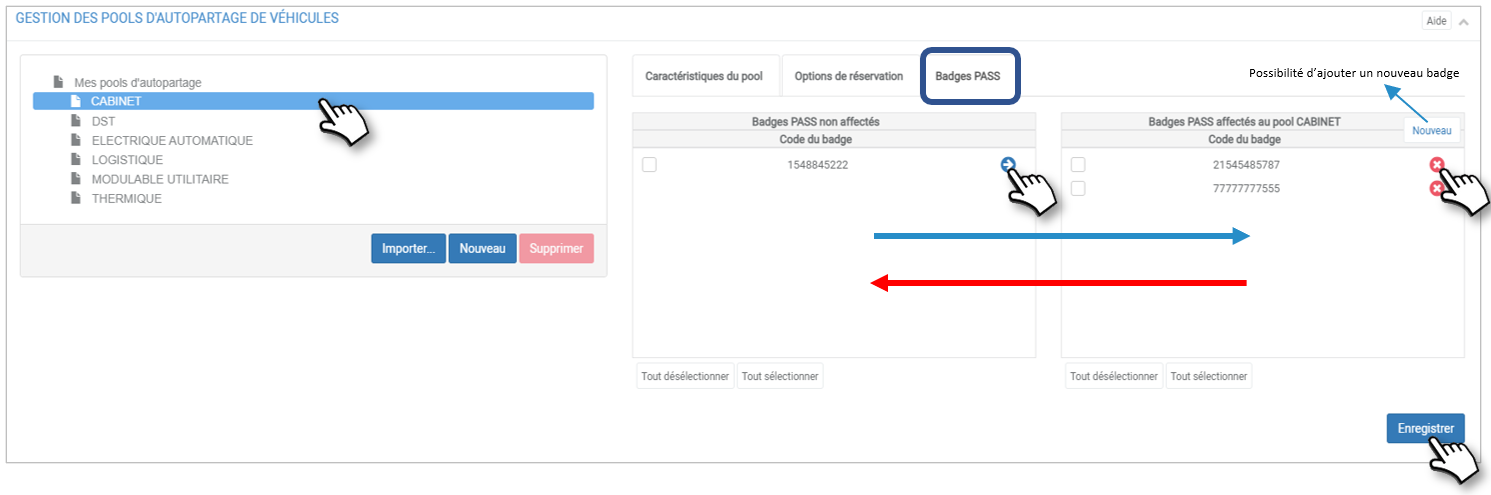
De-assign one or more badges:
1. Select the relevant pool (highlighted)
2. Click on the Pass Badges tab
3. In the right column (badges assigned to the pool): check the boxes of the concerned badges and click on the 'DELETE' button or click on the red crosses of the concerned badges.
4. The badges will move from the right column to the left column with the unassigned PASS badges.
Don't forget to SAVE
Info
- A single Pass badge can be assigned to several pools.
- Any vehicle entering a pool is automatically associated with the pool's badges
- Any vehicle leaving a pool is automatically dissociated from the badges of this pool.
Notification templates: modify emails and SMS sent to users

This page allows you to display and modify the emails and SMS that are sent automatically at each stage of the carsharing life.
Principles:
- You can change the content and subject of all emails and SMS that are listed in the drop-down menu.
- You cannot add or delete a mail template.
- Empty mail or SMS: it will not be sent.
- Check that the users' emails and SMS are filled in.
Modalities:
1. Select a template type from the drop-down list.
2. Modify the subject of the email if necessary.
3. Modify the content of the email and/or the SMS.
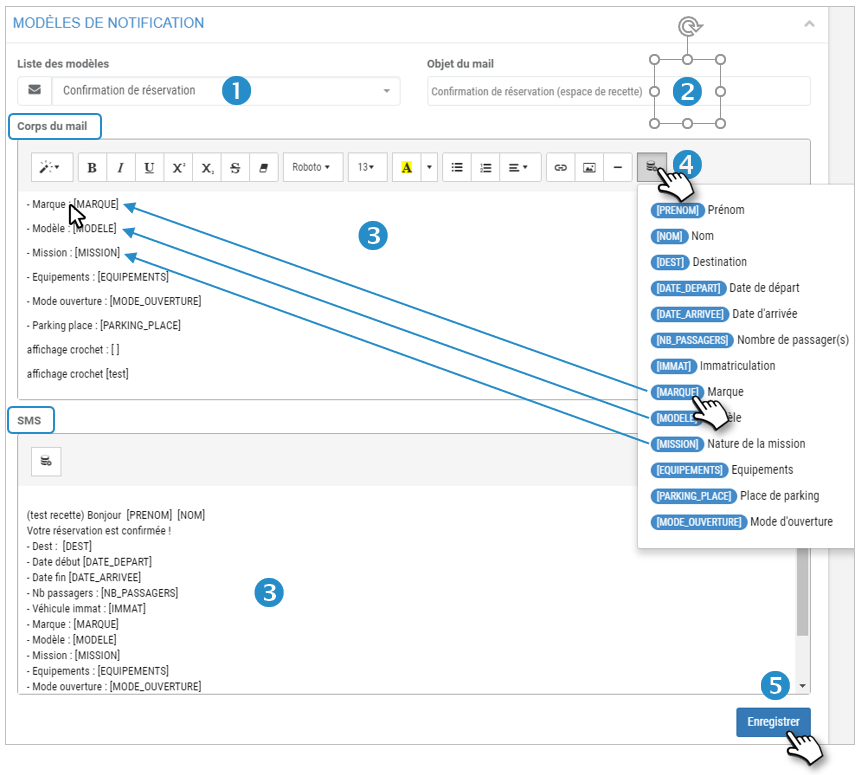
4. You can integrate rich/dynamic text in the body of the email and the SMS. This is already the case in the proposed templates.
By clicking on the desired field, it is inserted where your cursor is located.
The available fields are customized according to the type of email and SMS.
5. Do not forget to SAVE.
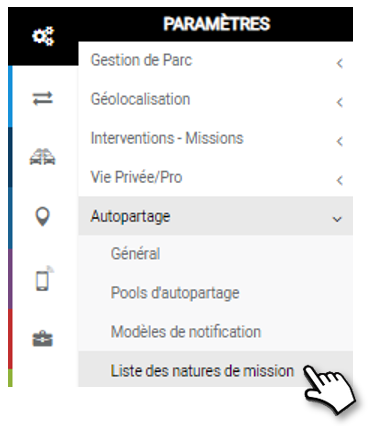
List of mission types
Create Reservation Reasons: This page allows you to create and modify reservation reasons from the drop-down menu in the user reservation form.
Modalities:
1. Enter the pattern
2. Click on ADD.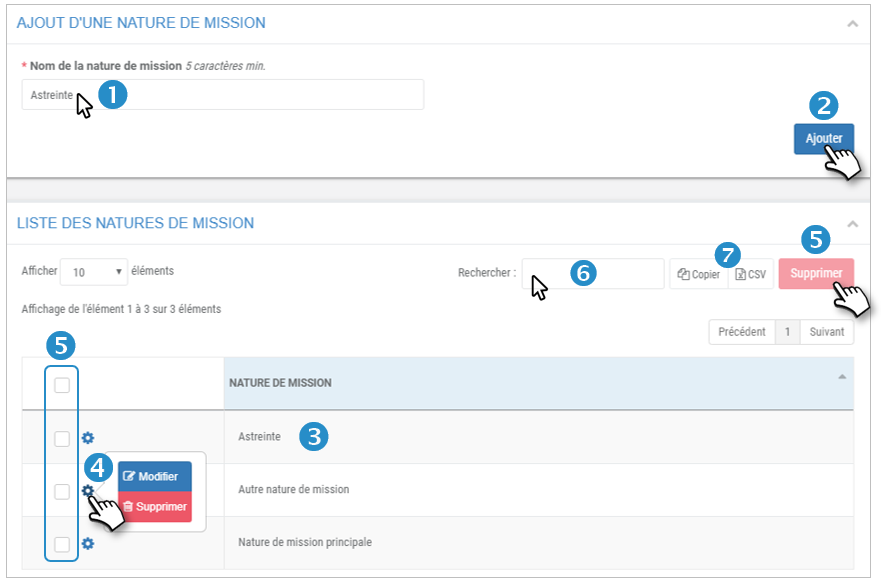
3. The pattern is added to the list.
4. You can EDIT or DELETE a pattern by clicking on  and selecting your choice.
5. Check multiple patterns and click on the DELETE button to delete them in one action.
6. You can perform a keyword search by entering the beginning of a pattern you are looking for.
7. You can copy the contents of the table or export it in .csv format.
Was this article helpful?