Manager
- 29 Jan 2024
- Print
- DarkLight
- Download PDF
Manager
- Updated on 29 Jan 2024
- Print
- DarkLight
- Download PDF
Article summary
Did you find this summary helpful?
Thank you for your feedback!
Preamble
The initial setup is the heart of your application's operation.
The setting of PRODUCTS, SUPPLIERS and ASSIGNMENT CENTERS must be done in the FLEET MANAGEMENT section because the vehicle orders must be attached to these items (see document PARAMETERS - FLEET MANAGEMENT).
Vehicles must also be ASSIGNED to Drivers (SETTINGS > COLLABORATORS > VEHICLE ALLOCATION).
The setting of the WORFLOW of the VEHICLES must have been made beforehand.
Global view
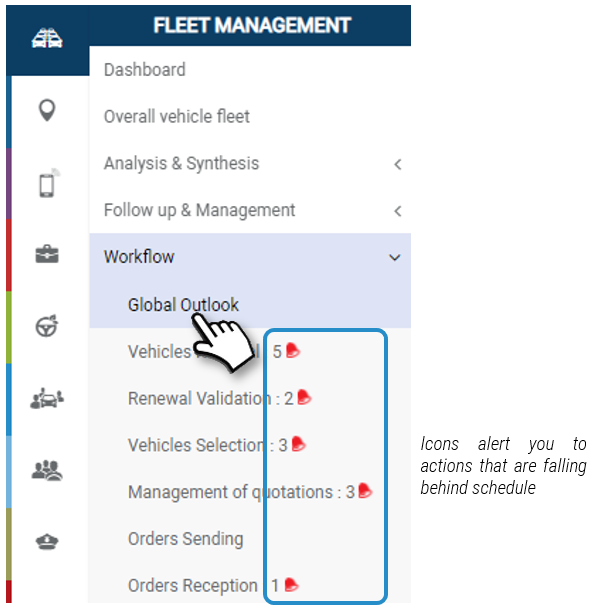
All vehicles in the process of being renewed are displayed on this page, regardless of the stage of the workflow in which they are located and regardless of their status.
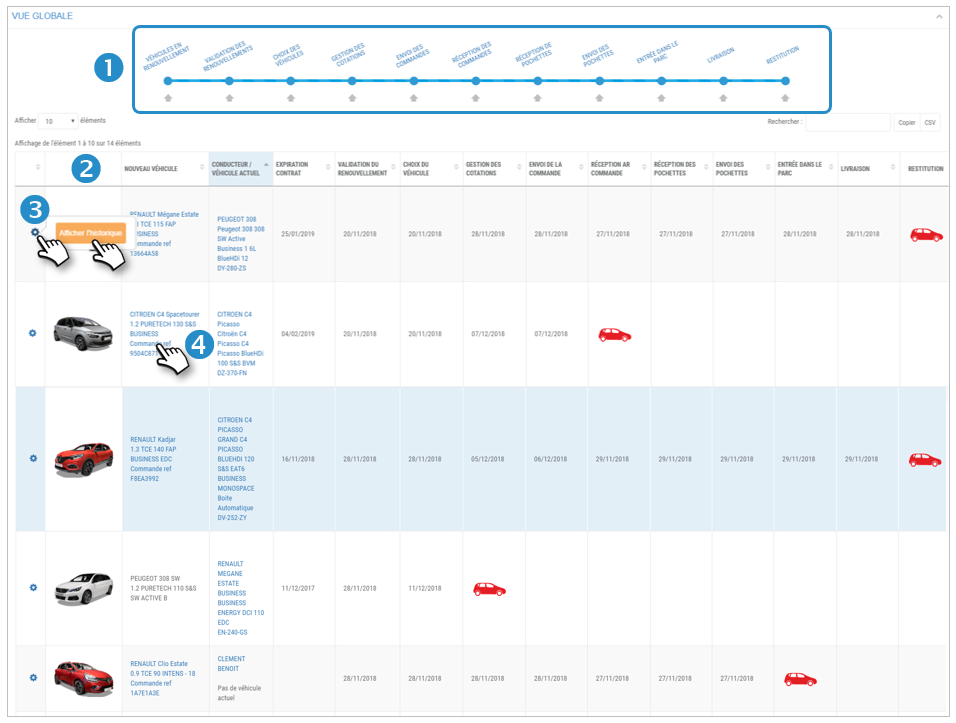
1. Progress bar with all workflow steps. You can filter the display by clicking on a step (see next page).
2. List of vehicles in renewal and date of the steps.
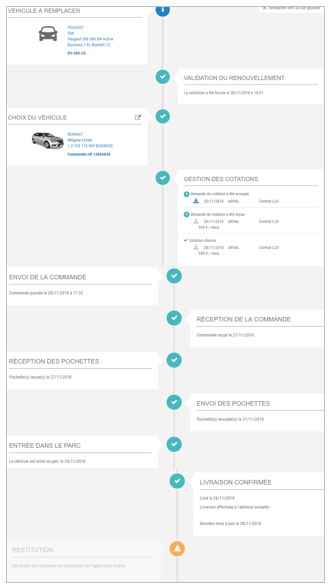
3. Click on  then on HISTORY to see the detailed history of the workflow of this vehicle in the form of a timeline.
4. Click to view the vehicle's file.
.png)
Action Status Legend:
The position of the icon indicates the stage at which the next action is to be carried out and the time frame in which to carry out this action:
 : on time; deadline met.
 : level 1 delay alert (depending on the number of days set)
 : level 2 delay alert (depending on the number of days set)
Filter the display of vehicles on a particular stage
You can filter the list of vehicles for each stage.
There are 2 filtering modes:
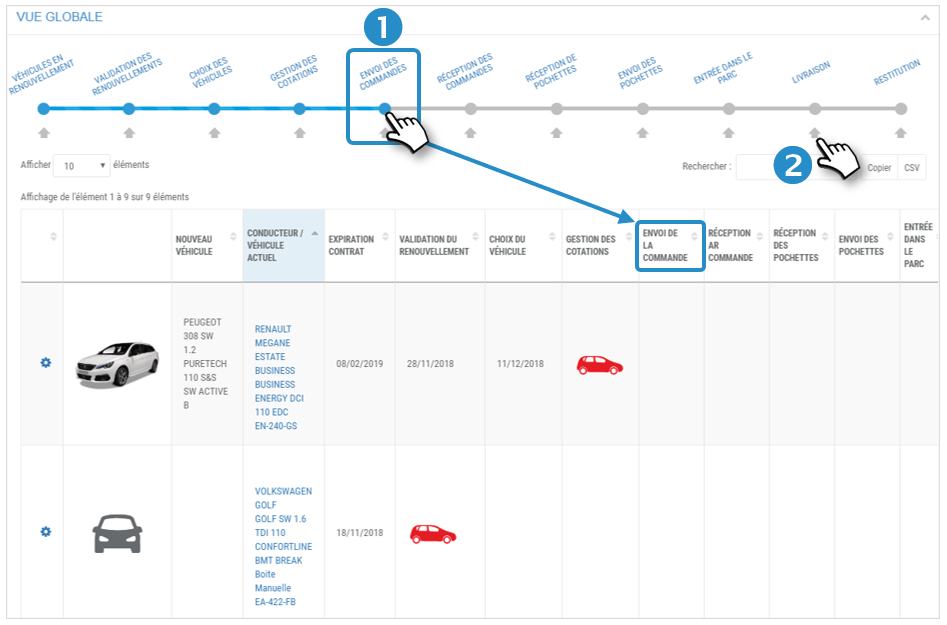
1. Click on  : displays the vehicles that are in this stage as well as those that are in previous stages.
2. Click on  : displays the vehicles that are precisely at this stage.
Meaning of the steps:
Global view: vehicles whose renewal has been initiated ("renewed" on the "vehicles in renewal" page)
Vehicles in renewal : vehicles eligible for renewal according to the setting ("Number of days before the end of a lease contract to trigger the renewal of a vehicle")
Validation of renewals: vehicles for which the renewal must be validated.
Vehicle selection: vehicles for which the new vehicle has not yet been selected.
Quote management: vehicles for which you can send, receive and view quotes.
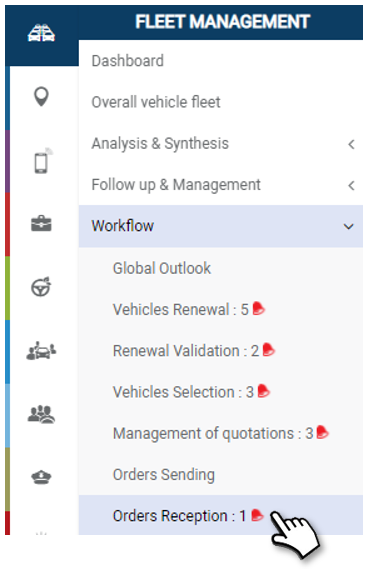
Sending orders: vehicles for which you can place an order to a supplier.
Receiving orders: vehicles received at the dealership.
Sending of kits: vehicles whose kits have been sent to the drivers.
Entry in the fleet: vehicles declared in the fleet.
Delivery: delivery of the vehicle to the driver.
Return: return of the old vehicle by the driver.
Vehicles in renewal
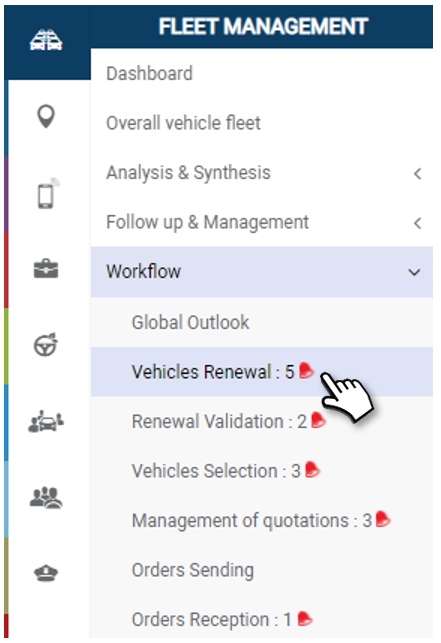
Initiate the renewal of eligible vehicles: this action will mark the entry of the vehicle in the workflow.
This page shows the vehicles eligible for renewal according to the settings made ("Number of days before the end of a lease contract to trigger the renewal of a vehicle").
The purpose of this page is to initiate the renewal of the vehicles in order to enter them in the workflow follow-up:

1. Select the vehicles to be renewed by checking the corresponding boxes.
2. Click on the RENEW button.
3. Or click on the icon and validate the renewal.
4. On some vehicles, the mention "Missing catalog" may appear. Go to the WORKFLOW PARAMETERS > Catalogs management to assign a catalog to this vehicle (see document "WORKFLOW - Parameterization").
5. Click to see who is/are the validator(s) for this vehicle.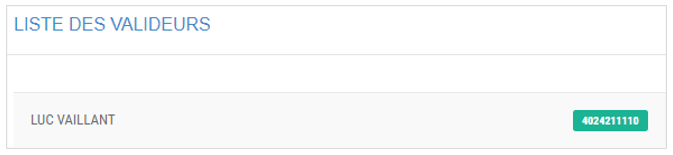
6. Click to view the vehicle's file.
.png)
Expiry degrees of the current contract according to the setting of the steps: 
Validation of renewals
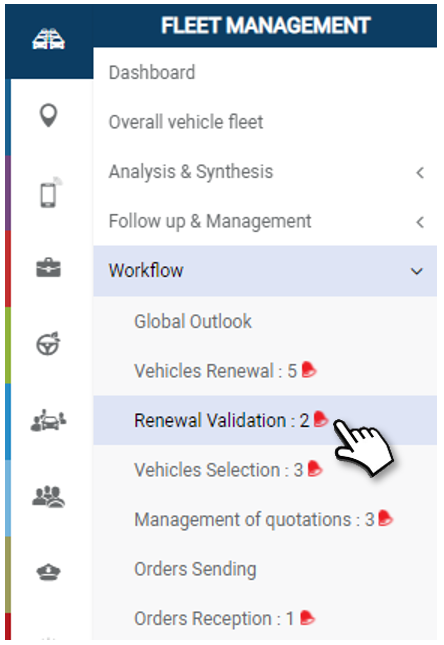
Only employees designated as "Validators" are authorized to validate renewals, but the administrator, manager or supervisors can force the actions.
Display of renewals :
The list of vehicles being validated for renewal is displayed:

1. You can search by keyword by entering the beginning of the catalog you are looking for.
2. You can copy the content of the table or export it in .csv format.
3. You can FILTER the display of the list of vehicles according to their degree of validation (all, none, partial, complete).
Renewal Status:
4. When validators have validated the renewals, the mention appears in the table.
If the renewal has been validated, you can inform the Driver and ask him to choose his vehicle from the selection that has been made.
5. Check the boxes of the vehicles concerned and click on the SEND TO DRIVER button.
If the validation of the renewals is delayed, you can restart the validators.
6. Check the boxes of the concerned vehicles and click on the SEND TO VALIDATORS button.
You can also, if you have the rights, force the validation of vehicles and go to the next step
Forcing the validation of a renewal :
1. Click on the vehicle icon and select
If this option does not appear, it is because no Validator has been selected for the Assignment Center to which the vehicle to be renewed belongs.
The renewal is validated. You must now move on to the next step: choosing the vehicle.
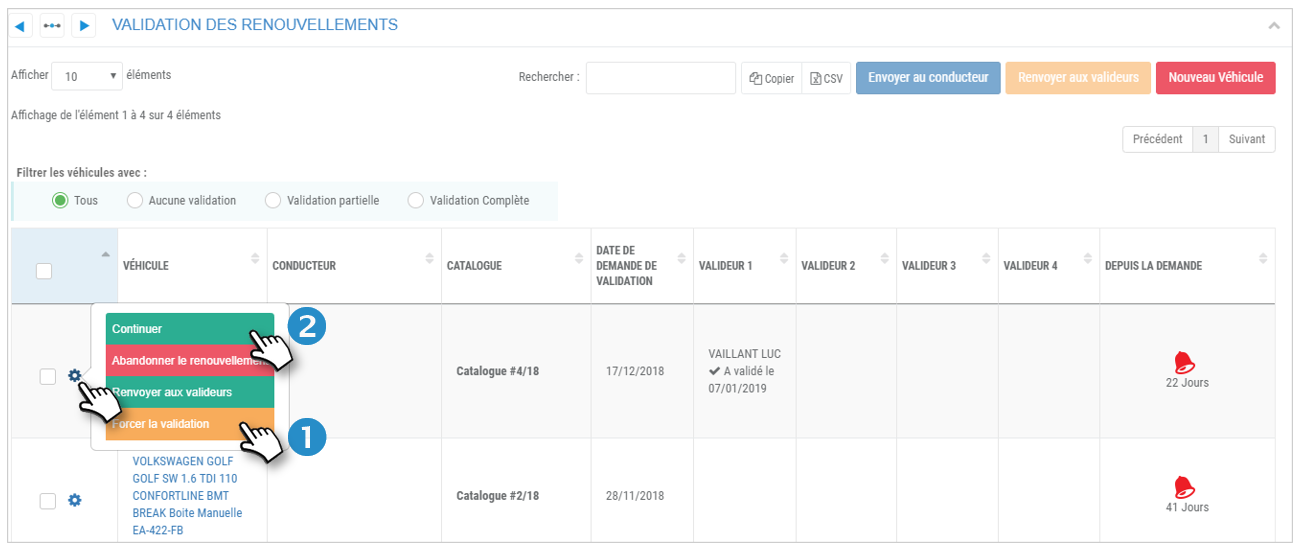
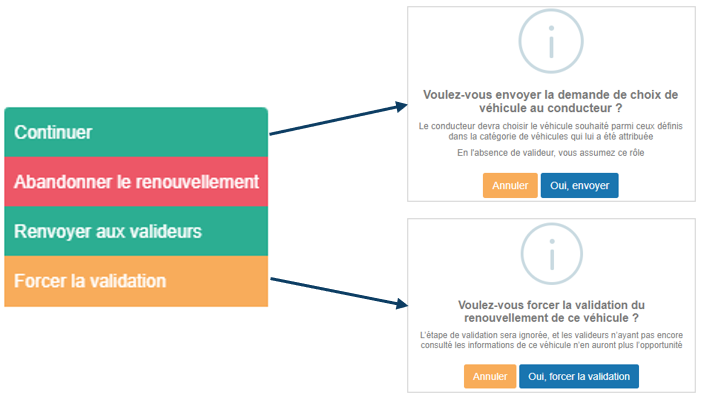
Continue the process (choice of vehicle):
2. Click on the vehicle icon and select
The renewal of the vehicle will be tacitly validated and the driver will be informed of this validation and of the choice of vehicle he has to choose.
The vehicle will then no longer be visible in this step and will go to the next step (Choice of vehicle)
The choice of the vehicle must be done by the Driver but can also be done by the Manager or the Supervisor if they have the rights (next section)
Choice of vehicles
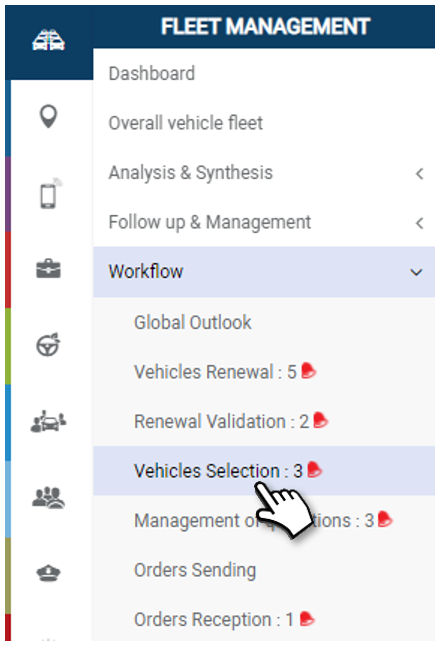
Display the vehicles to be selected by the drivers
Relaunch the drivers. Proceed to the next step.
1. You can search by keyword by entering the beginning of the catalog you are looking for.
2. You can copy the contents of the table or export it in .csv format.
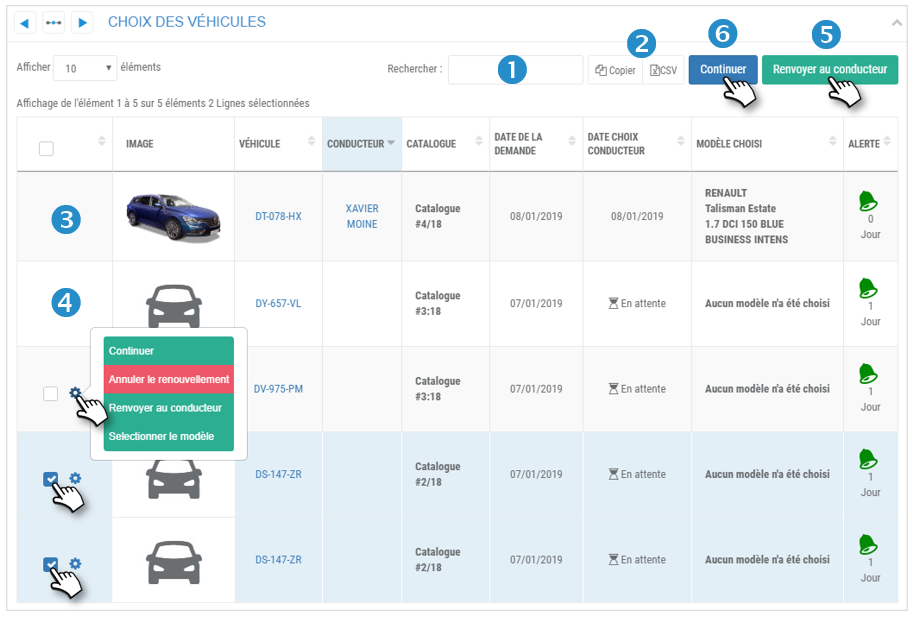
Vehicles to be selected by drivers:
3. Example of a vehicle already chosen by the driver (photo of the vehicle + date of choice + model chosen.
4. Example of a vehicle not chosen (icon + 'pending' + no model)
Boost the driver(s):
5. Check the boxes of the concerned vehicles and click on the REFER TO DRIVER button. The driver will receive a notification on his cell phone.
Proceed to the next step for vehicles already selected:
6. Check the boxes of the vehicles concerned and click on the CONTINUE button.
The vehicles will go to the next step: Quote Management.
Select a model on behalf of a driver
1. Click on the icon of the vehicle to be renewed, then on SELECT MODEL
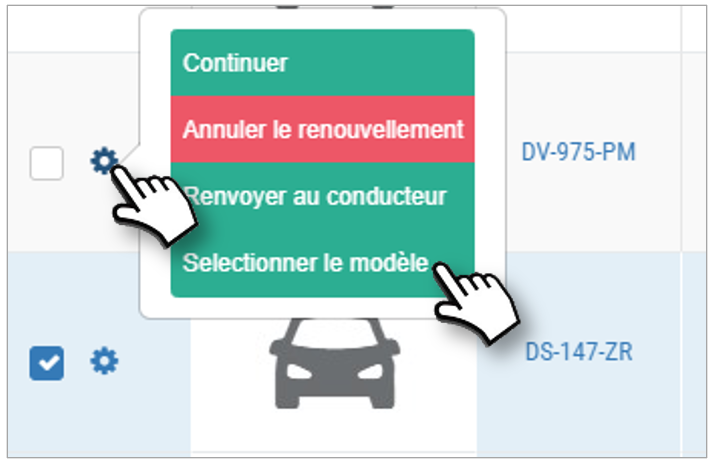
2. A new page will appear with a list of vehicles from which you must select one.
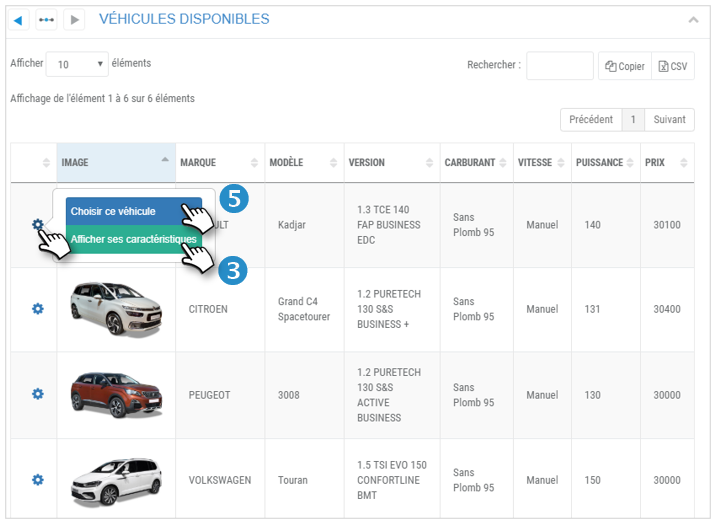
Display the vehicle characteristics :
3. Click on the icon of a vehicle, then on DISPLAY FEATURES
4. You will access the vehicle's file with all its characteristics.
.png)
Proceed in this way until you have made your choice.
Choosing a vehicle:
5. Click on the icon of the selected vehicle, then on SELECT THIS VEHICLE.
6. The application asks you to enter a desired address and delivery date:
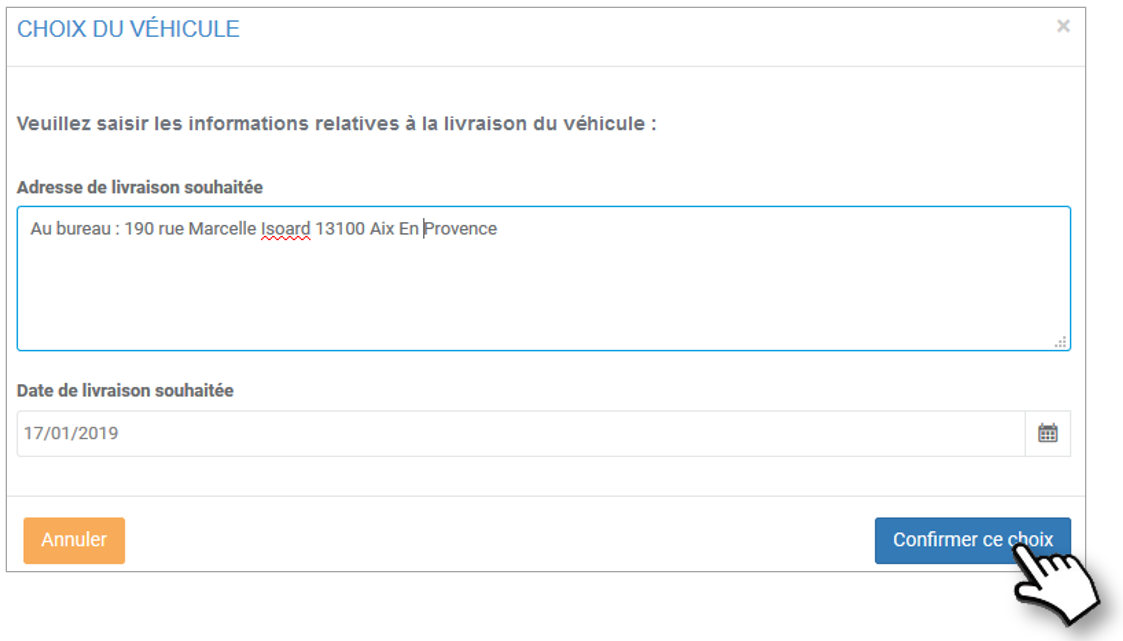
7. The selected vehicle appears in the list:

Now it's time to move on to the next step:
Quotation management
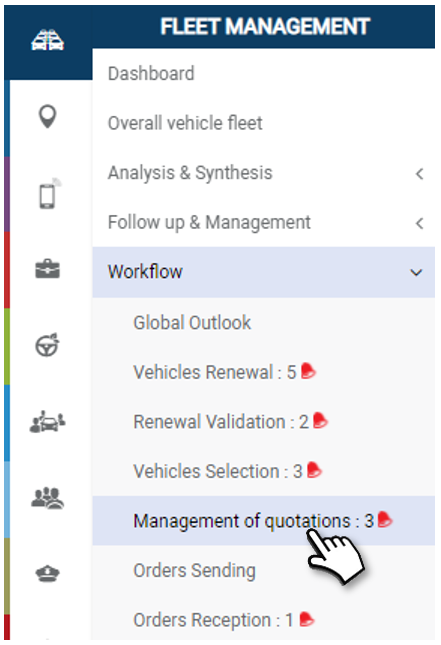
Request quotes from service providers and track their progress
Display of quotations :
1. You can search by keyword by entering the beginning of the catalog you are looking for.
2. You can copy the content of the table or export it in .csv format.
3. You can FILTER the display of the list of vehicles according to the status of their quotation (to be sent, pending, received, hidden)
4. Click on  to display the different choices according to the referenced providers.
5. Check one or more boxes of the quotes you want to hide in the table and click on HIDE
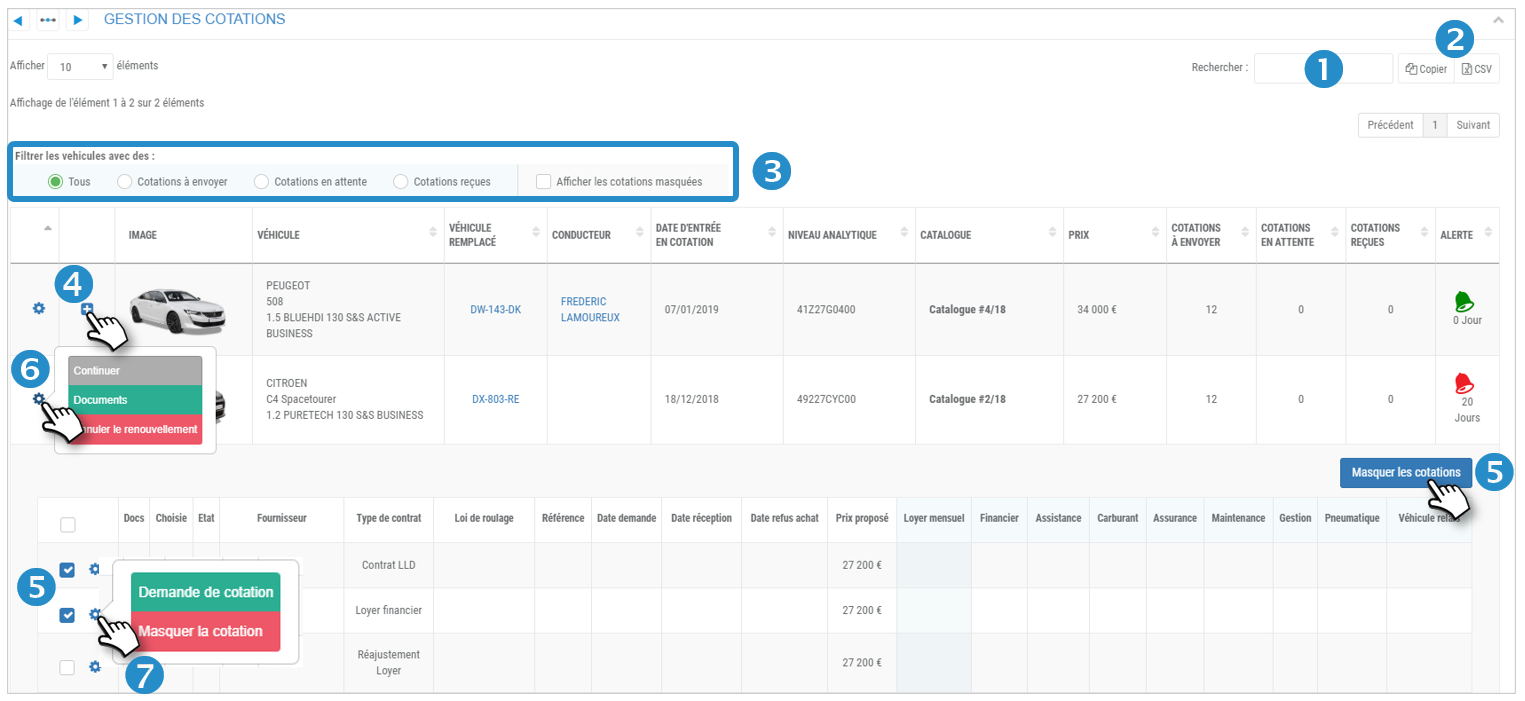
Quotation management :
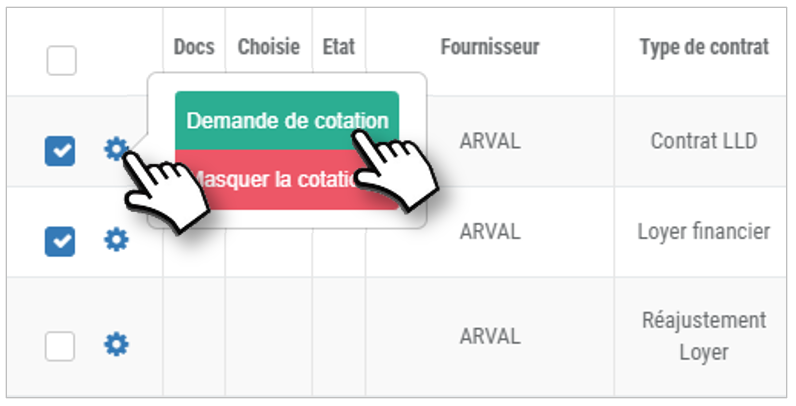
6. Click on a vehicle icon to display 3 action buttons:
 : INACTIVE button because you must request a quote before placing an order
 : Electronic document management (SAVE, consult...)
 : Cancel the renewal of this vehicle.
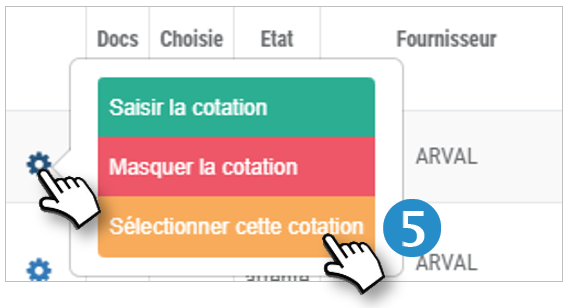
7. Click on the icon of a quotation to display 2 action buttons:
 : Request a quote from the service provider
 : Hide this quotation in the table.
Request quotes from providers and track their progress: ask for and compare their quotes.
Ordering process:
1. Request for quotation 2. Receipt of response 3. Entering the quotation (4. Select quotation and send order)
Request for quotation :
1. On the concerned quotation, click on then QUOTATION REQUEST.
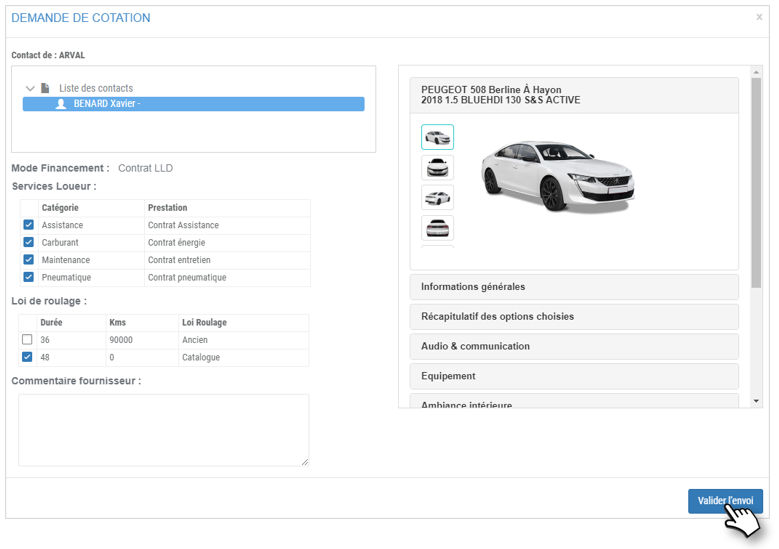
2. Fill in the desired information in the form that appears, select a contact and VALIDATE.
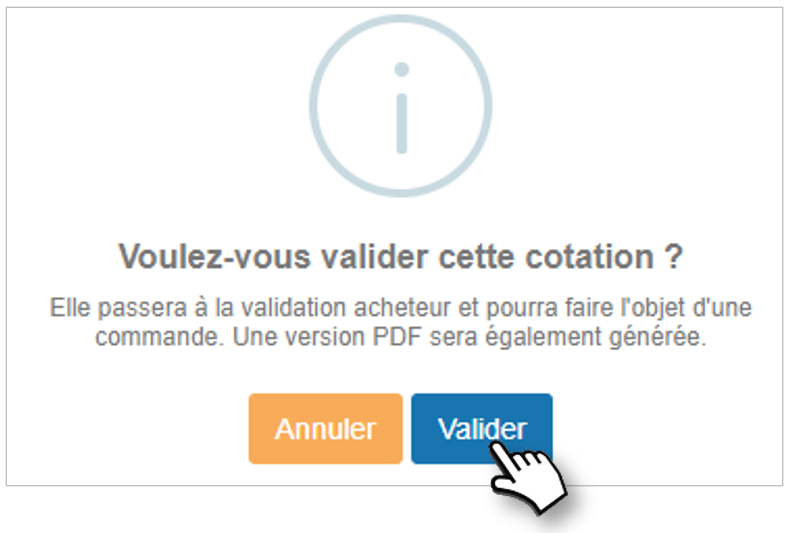
3. Confirm the quotation.
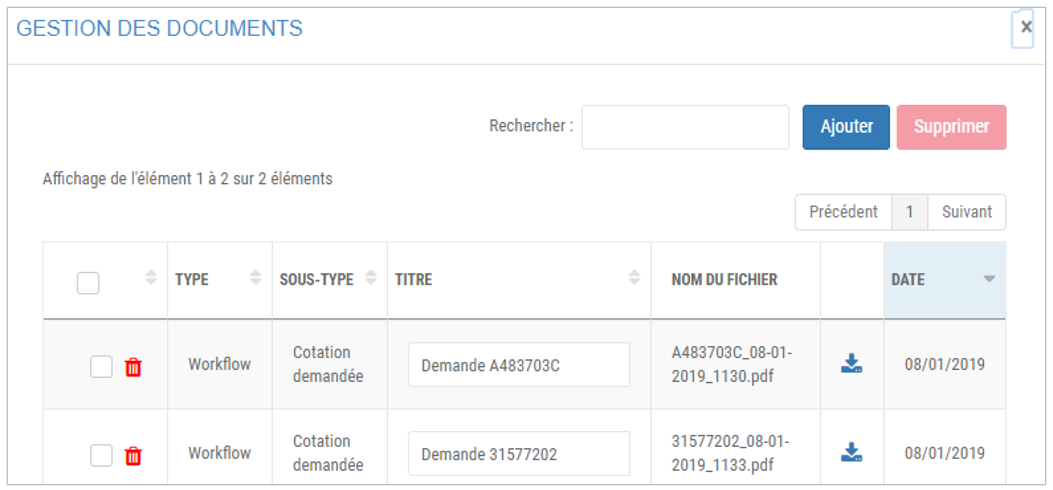
4. A new line appears at the bottom of the form. The application has been generated in a .pdf document. Click on  to access the document.
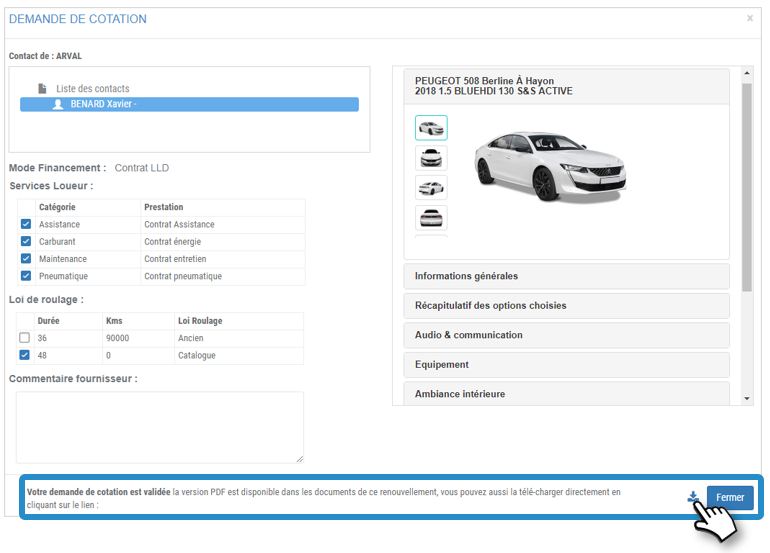
5. Complete the .pdf document if you wish.
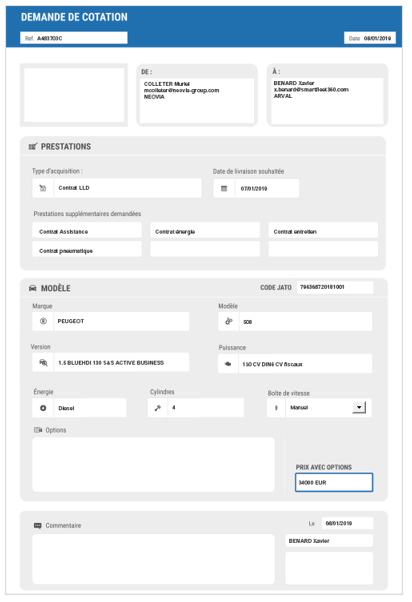
6. The quote request is SAVED and the status is changed.

7. Click to access the electronic documents.
Request for supplier quotation
Various quote STATES: (empty) Pending Received Held
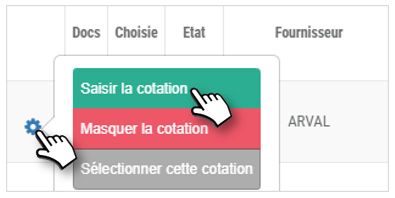
1. On the concerned quote, click on then SEIZE QUOTE.
2. Fill in the desired information in the form that appears (including the mandatory PRICE INFO), then :
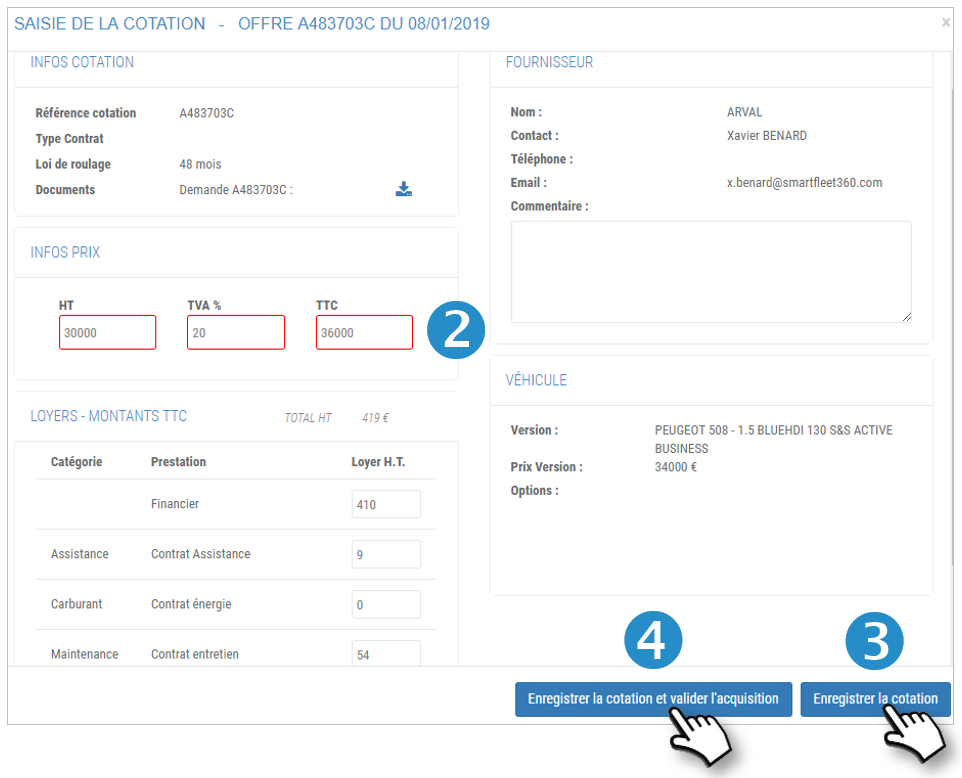
3. Click on SAVE: the quotation will be saved and remain at the current stage.
4. Click on SAVE and ACQUIRE: the quote will be saved and retained. It will automatically go to the next step: SEND ORDERS (next page).
5. If you have simply SAVED the quotation, click on then SELECT THIS QUOTATION.
6. A confirmation message will be displayed. Validate.
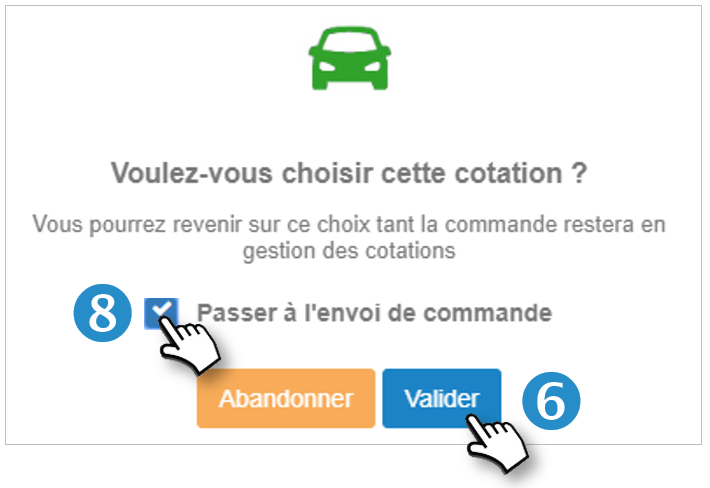
7. A check mark appears in the "Chosen" column

8. Check the box if you wish to skip the quotation to the SEND ORDERS step
Sending orders
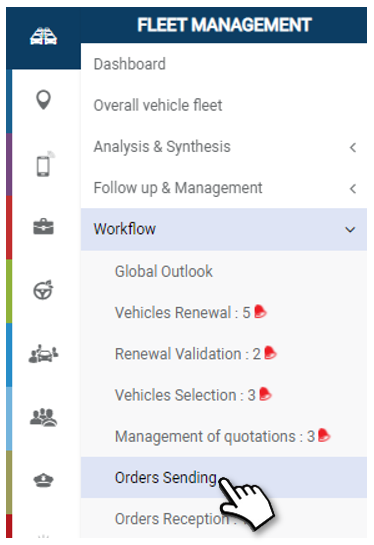
Order your vehicles from your service providers
The order is done online and you will be alerted of its reception.
Place multiple orders in 1 click:
1. Check the boxes of the vehicles concerned.
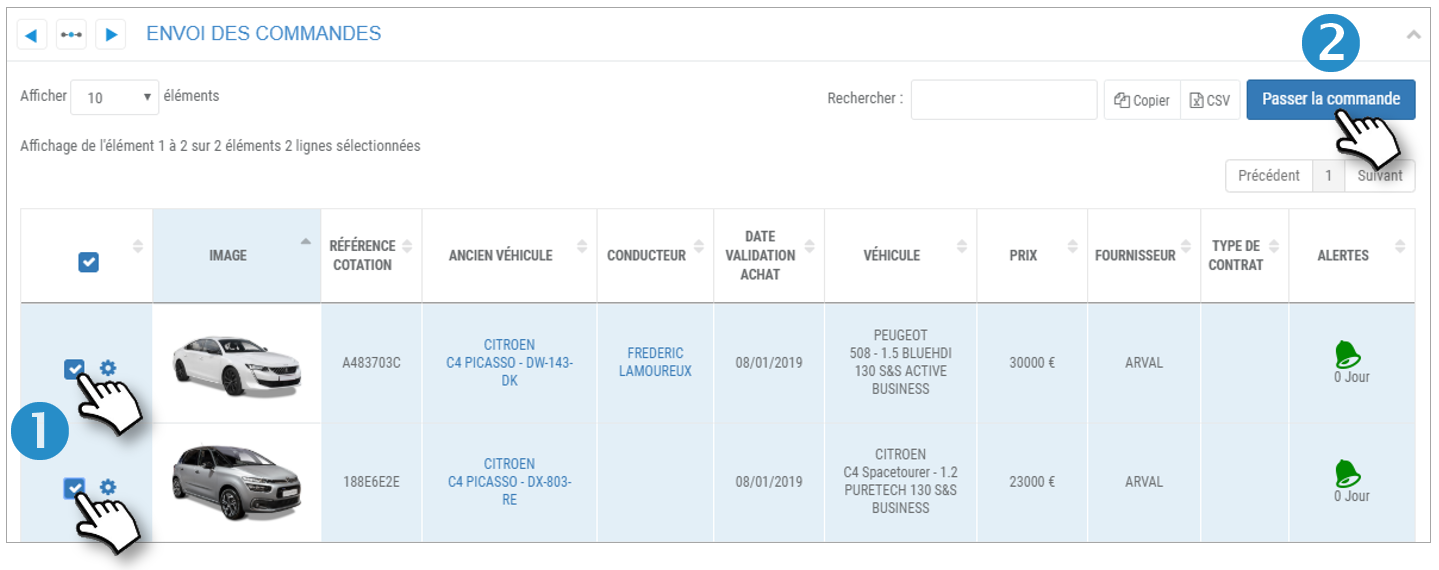
2. Click on the ORDER button.
3. The vehicle disappears from the list in this step and appears in the list in the next step: RECEIVING ORDERS.

Ordering a vehicle:
4. On the vehicle concerned, click on then PASS THE ORDER.
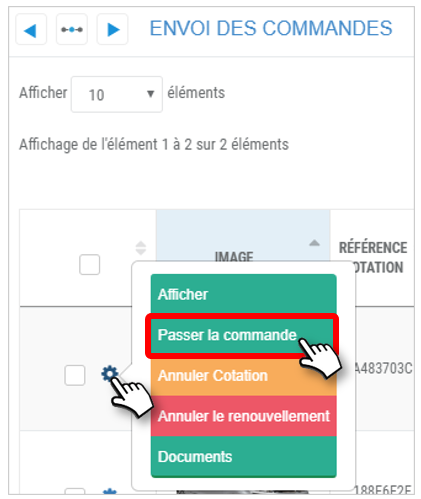
5. The vehicle disappears from the list in this step and appears in the list in the next step: RECEIVING ORDERS.
Receipt of orders
Track the entry of vehicles into the fleet and their delivery to employees
Enter the dates of the last steps and the delivery address.
Display of orders and their progress:
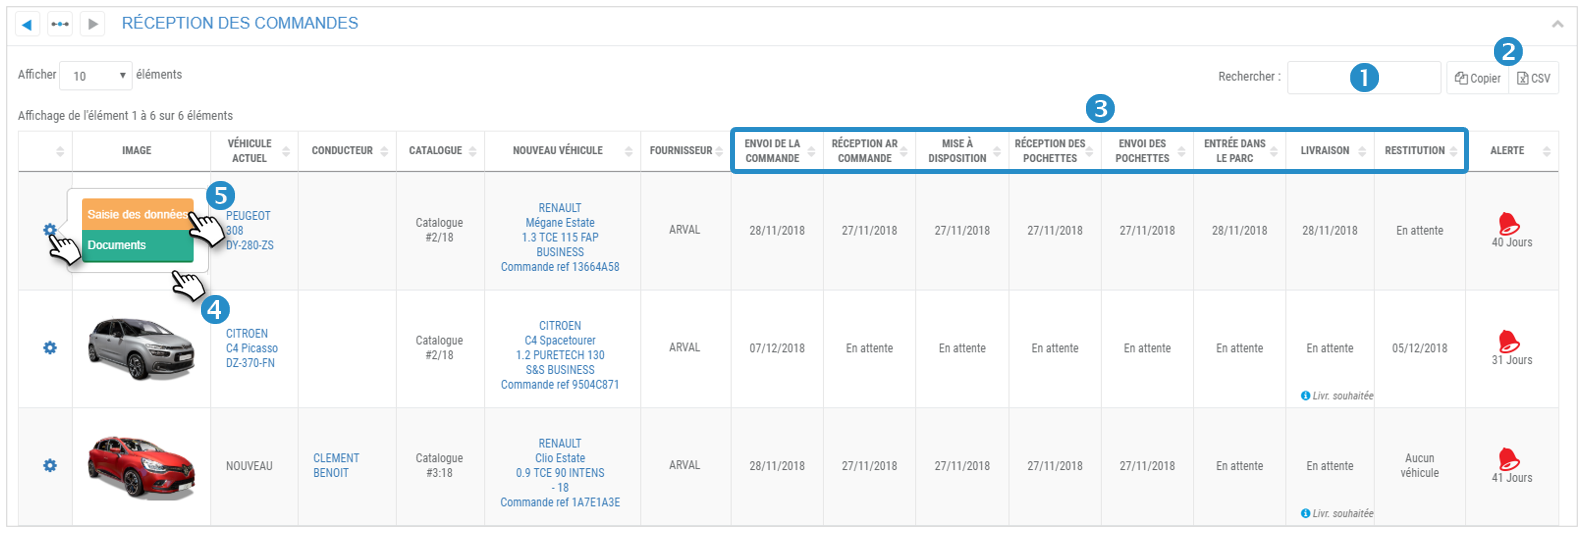
1. You can search by keyword by entering the beginning of the catalog you are looking for.
2. You can copy the content of the table or export it in .csv format.
3. The table displays the list of ordered vehicles and the dates of the next steps.
4. Click on then 'Documents' to consult and/or add electronic documents related to this vehicle.
Delivery tracking:
5. Click on then 'Data entry' to fill in the dates of the next steps:
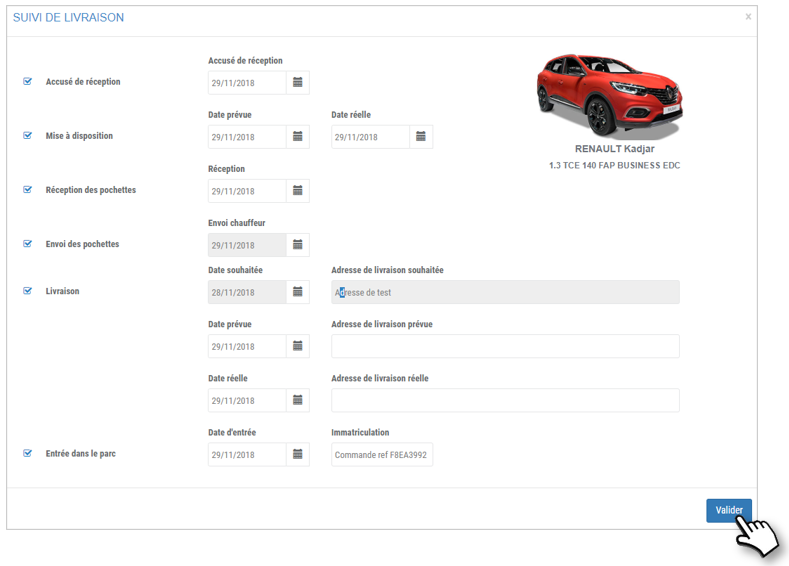
- Acknowledgement of receipt
- Provisioning
- Receipt of packets
- Sending of the bags
- Delivery and delivery address
- Entry in the park
If you enter a date in a step without a date entered in the previous steps, this date will be automatically adopted for the previous steps.
6. Don't forget to VALIDATE
Ordering a vehicle (excluding renewals)
Order a vehicle for an employee
This is the "non-renewal vehicle" procedure: for a new employee or for an employee who did not have a vehicle before.
1. Click on 
In the window that opens:
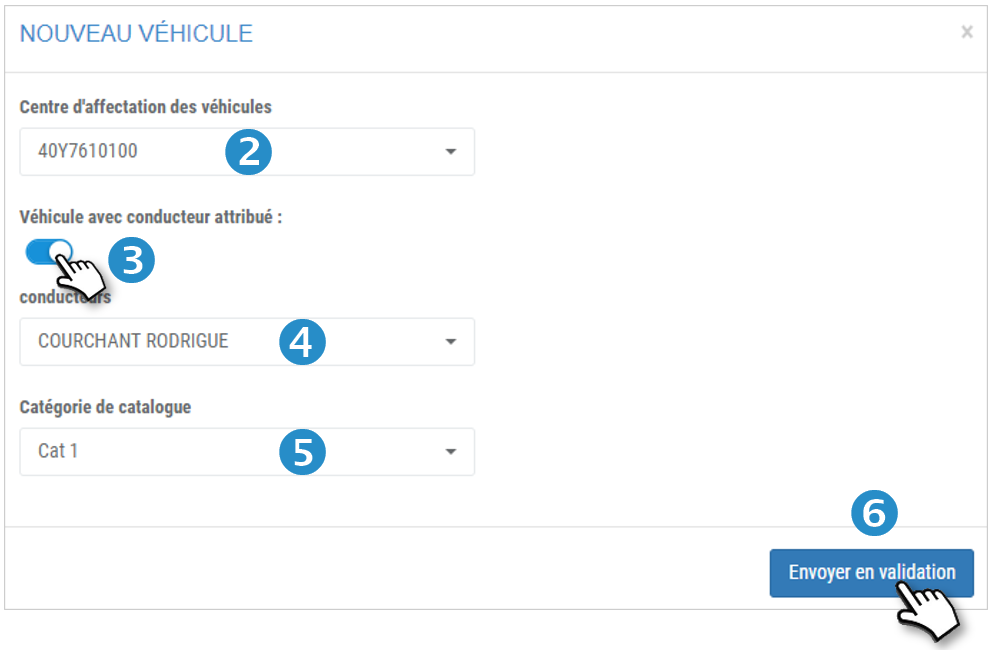
2. Select the vehicle assignment center
3. Select if it is a vehicle with an assigned driver.
4. If applicable, select the driver.
5. Select the appropriate catalog category.
6. Click on SEND FOR VALIDATION.
The vehicle will appear in the list with the vehicles to be validated and in the general workflow.
Pending approvals
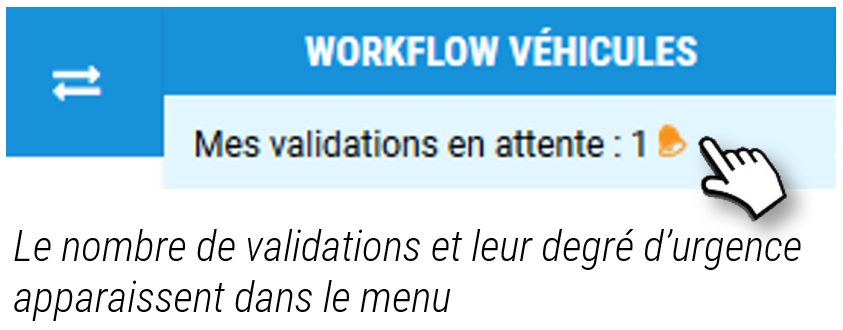
Display of pending validations and history :
By default, the table displays the validations that have been pending for 1 month.
If you want to filter the results on certain criteria, proceed as follows:
1. Select the 'Validations' or 'History' action
2. Select the desired calendar period
3. Click on APPLY to display the results in the table.
4. You can search by keyword by entering the beginning of the catalog you are looking for.
5. You can copy the contents of the table or export it in .csv format.
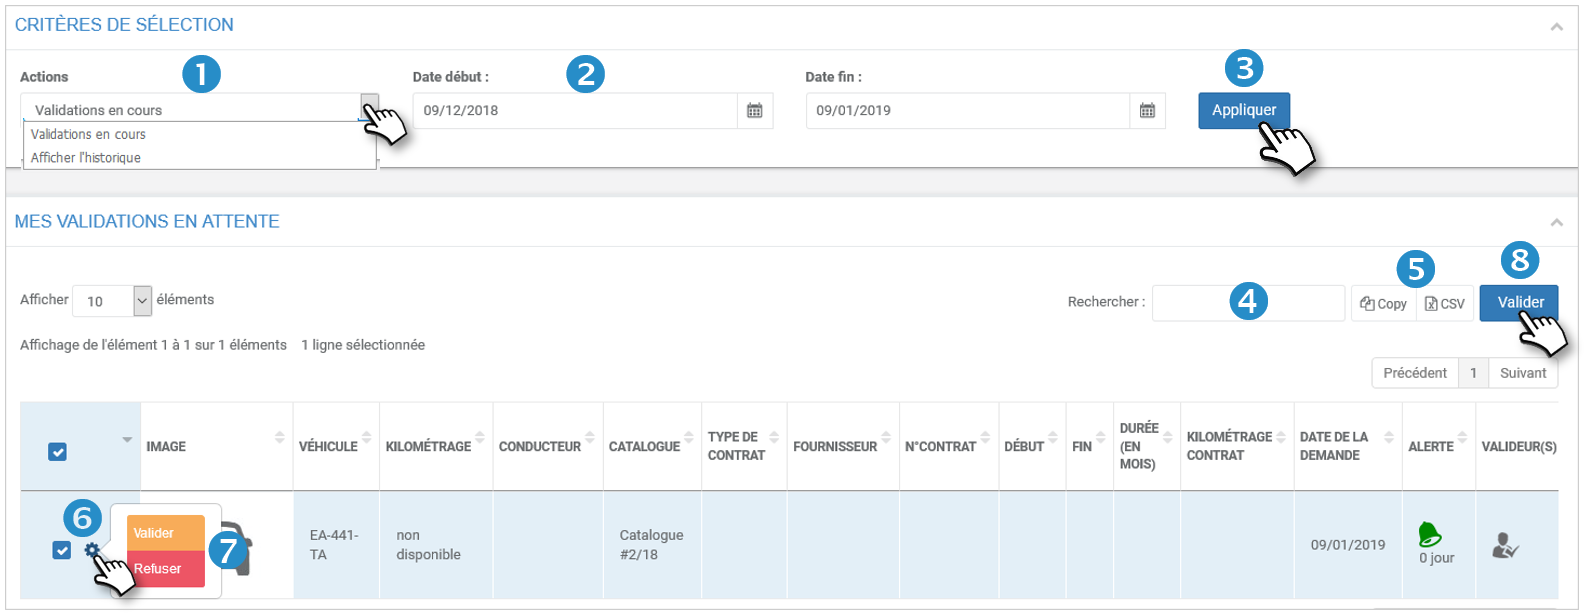
Validate or refuse the renewals:
6. Click on the icon of a vehicle.
7. Click on VALIDATE or REFUSE according to your choice.
8. You can validate several renewals in 1 click by checking the boxes of the concerned vehicles and clicking on the VALIDATE button
The line disappears from the table "Pending validations" to be accessible by selecting "View history".
Was this article helpful?