Setting up the units
- 03 Dec 2021
- Print
- DarkLight
- Download PDF
Setting up the units
- Updated on 03 Dec 2021
- Print
- DarkLight
- Download PDF
Article summary
Did you find this summary helpful?
Thank you for your feedback!
Several criteria reduce the life of the battery
On the other hand, some factors disturb the location of the beacon
Configuration of the tag
GPS location
Motion detector
Alerts (temperature, light, border, distance, inactivity...)
Frequent movements
Outdoor conditions
Low outdoor temperature
Topography: difficulty to get a GSM and/or GPS signal
Factors affecting the reception of GSM and GPS signals
Classical factors affecting the propagation of waves (idem cell phone):
Indoor: inside the building
Topography (mountains ...)
For an optimal life span:
GSM positioning
1 position per day
GSM triangulation or GPS position?
Each setting has its advantages and disadvantages
 GSM TRIANGULATION
The position of the beacon is estimated by retaining the overlap area of 3 GSM relay antennas.
The area thus retained may vary depending on the density of the GSM network and the power of the antennas.
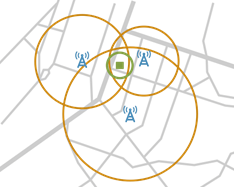
Suitable for approximate location in an identified area
Long battery life
 GPS POSITION
The position of the beacon is given from the triangulation of at least 3 satellites. It is more accurate.
The accuracy of the GPS position may vary depending on the number of satellites receiving the signal (topography).
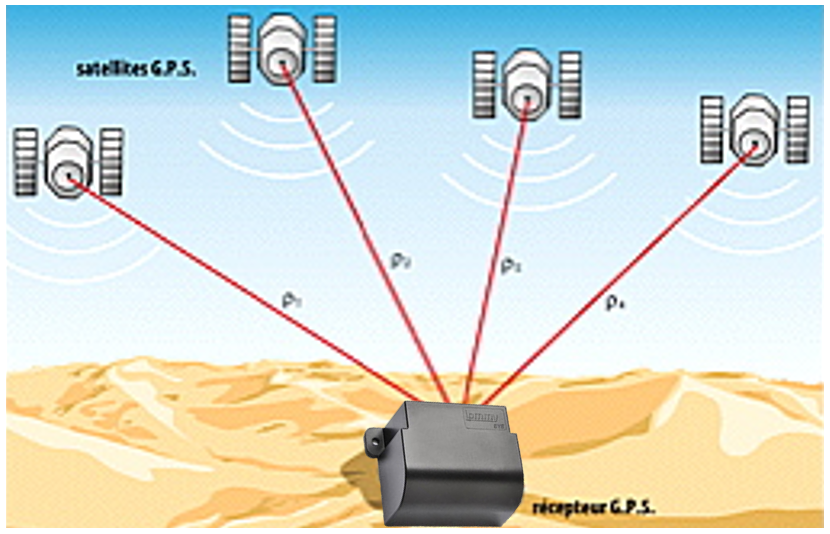
Suitable for precise location
Reduced battery life (-15%)
Information
THE IMPACT ON BATTERY LIFE IS DUE TO THE FREQUENCY OF UPCOMING AND ACTIVATION OF THE SENSORS (movement, light, temperature, RF...)
Unit identification
1. Select the concerned tag from the list
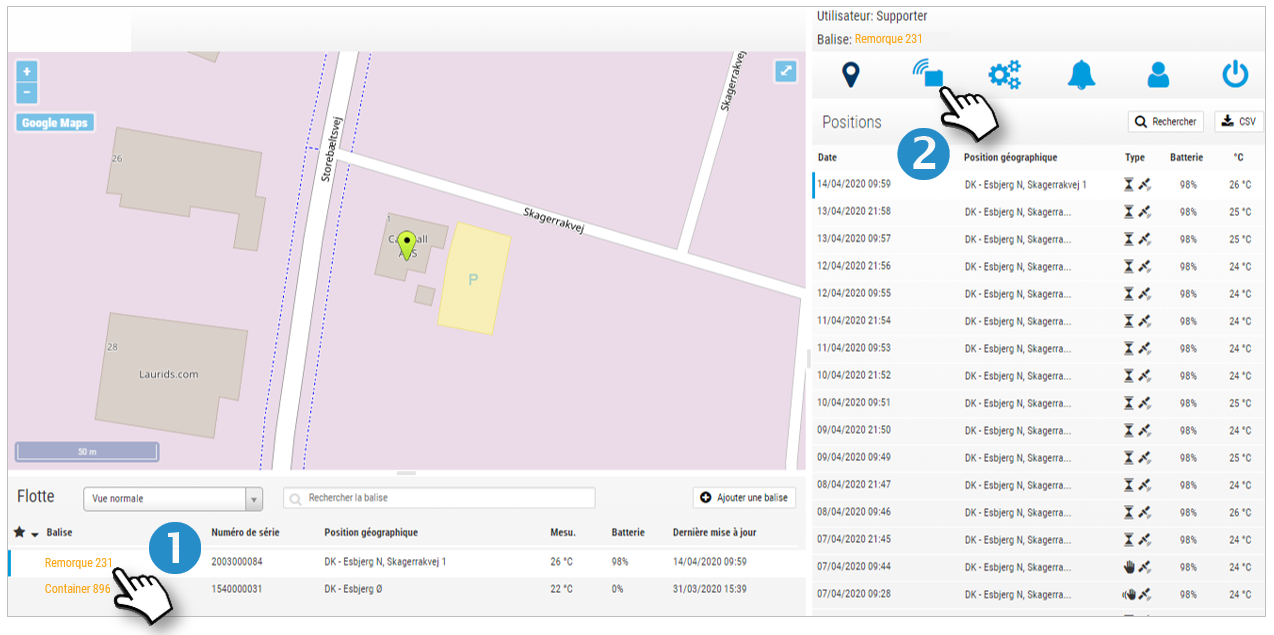
2. In the administration module, click on 
3. Tag data: fill in the following fields: name, description, comments.
4. Select an identification icon that will appear in the list on the left. You can assign the same icon to tags of the same type (trailers, tanks, cars...) or belonging to the same group (regional for example). You can choose to display the tags of a group on the map (see section MAP).
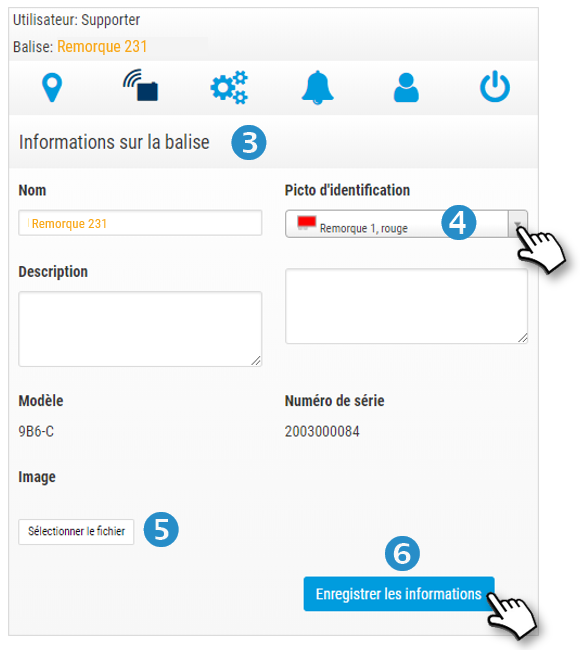
5. If you wish, you can select an image on your computer as an icon.
6. Don't forget to SAVE your information.
Share the position of the unit with a third party
You can give access to the platform to a third party (a customer for example) to view the position of the tag.
7. Click on 
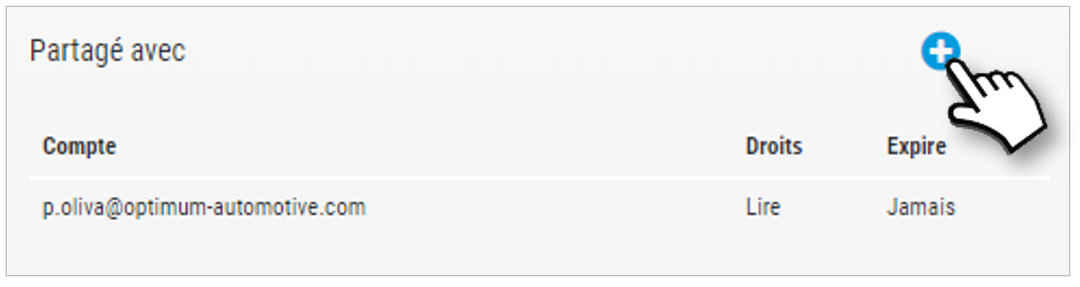
8. A window opens in which you have to fill in :
- The email address of the recipient
- The type of access: Read only or Modification (of settings)
- A possible expiration date of the access rights
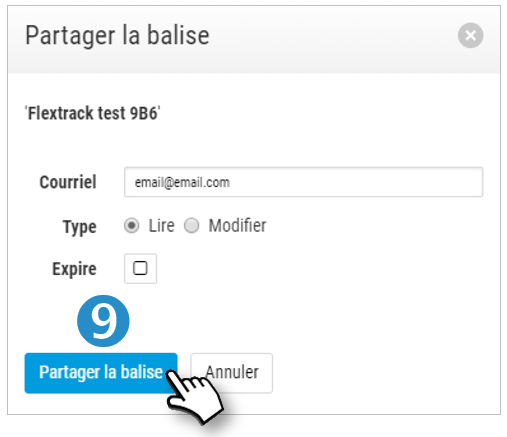
9. Click on SHARE. The recipient will receive an email allowing him/her to connect.
Tags under surveillance (requires the use of additional equipment)
You can equip sites with Radio Frequency receivers. The beacons, themselves equipped with an RF signal transmitter, will dialogue with the receiver and can therefore signal their presence. Or their absence.
To add monitoring tags to a receiver :
1. Click on

2. A window opens in which you must enter :
- The serial number of the FR receiver
- The description of this receiver. Ex: Storage warehouse.
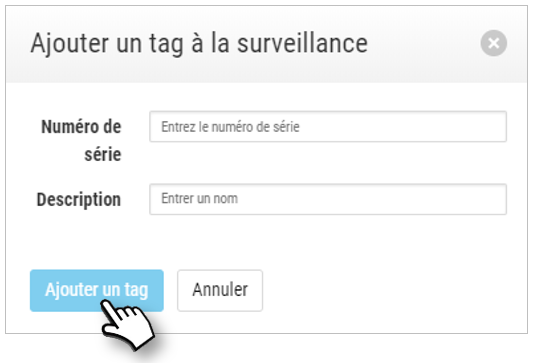
3. Click on ADD. The positions of the tag that will be retrieved will be identified by this icon 
Configuration of the location
1. In the administration module, click on 
Intervals between positions
DEFAULT INTERVAL: 1 GSM POSITION EVERY 24 HOURS (to save the battery)
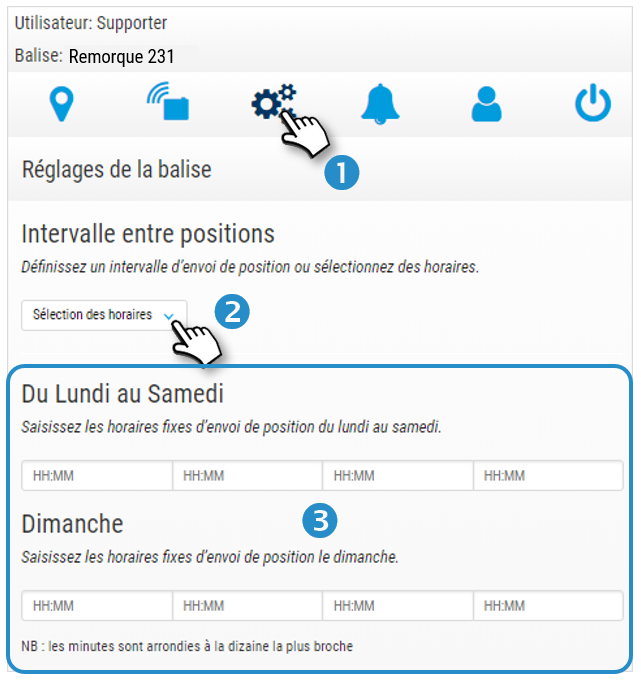
2. You can change and select another position sending interval. This choice will impact the battery life. The default sending time is the one when the beacon is activated in the factory.
3. You can schedule the sending time of the position(s) (4 maximum per 24 hours) according to the first 6 days of the week and Sunday. Enter the desired time for the position(s). This choice deactivates the previously selected periodicity, if the number of positions differs. This choice will impact the battery life.
Information
This new interval will only be taken into account the next time the beacon connects to the server.
For example: the time of sending the position is 11:00. If you want a position at 12:00 and 15:00 and you make the modification before 12:00, the next position will be at 12:00 the same day. If you make the change at 4pm, the next position will be at 12pm the next day.
4. Don't forget to SAVE your information.
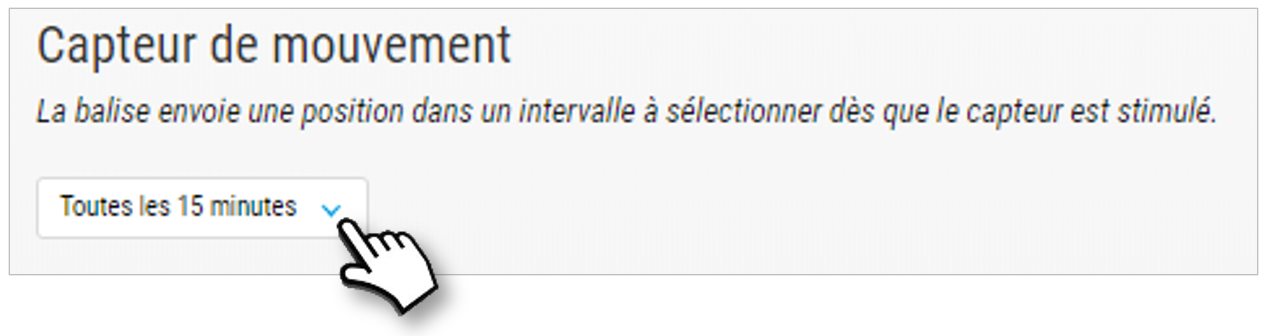
Motion sensor
When the sensor detects movement of the beacon, it sends a position at regular intervals.
By default, the sensor is OFF (to save battery power)
To activate it, select a position sending interval. This choice will impact the battery life.
The effect is instantaneous. If the beacon moves in the minutes following the new configuration, a position will be sent instantly, then according to the selected interval.
Don't forget to SAVE your information.
Light sensor
The sensor detects the brightness and sends a location. If you place the beacon in a vehicle, box or other container that should not be opened, configure the sensor by checking the box:
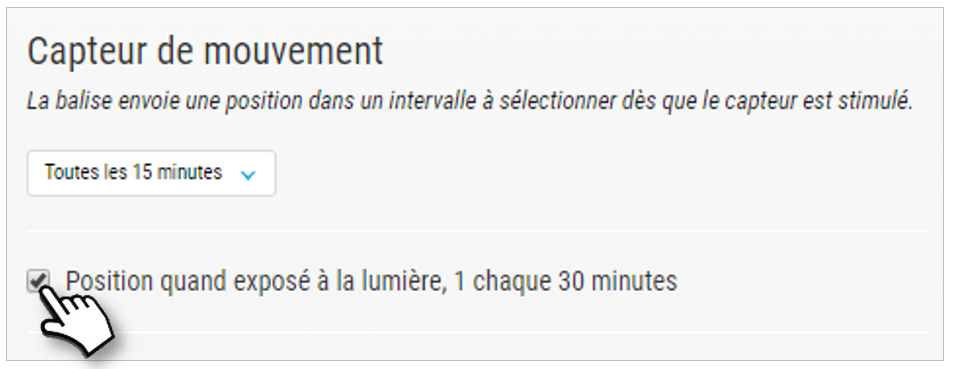
A position will be sent every 30 minutes.
Don't forget to SAVE your information.
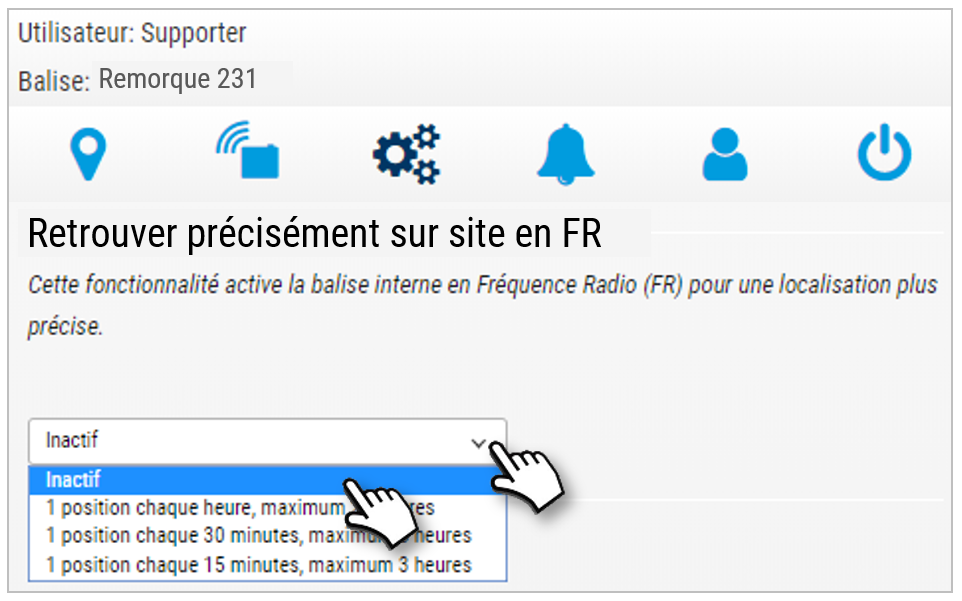
Find precisely on site in RF (Radio Frequency)
Your activity may require a very precise location to find a property among many similar properties.
If the GSM and GPS localisations are insufficient, you can activate the RF (Radio Frequency) localisation. By default, this feature is inactive, as it is very energy consuming.
Select the frequency for sending RF locations:
This selection will generate 2 actions on the tag:
Sending of positions according to the selected frequency, visible in the module, tab  of this type:
Emission of an RF signal every 5 seconds to locate the beacon ON-SITE with a Detector (see section LOCALIZATION ON-SITE)
GPS
You can activate the localization of the beacon by GPS positioning. This choice will impact the battery life.
BY DEFAULT, THE BEACON IS CONFIGURED IN GSM POSITIONING.
GPS positioning is more accurate but will result in higher battery consumption.
1. Check if you want to receive the next X positions via GPS (1 to 10 max). Enter the number of positions desired.
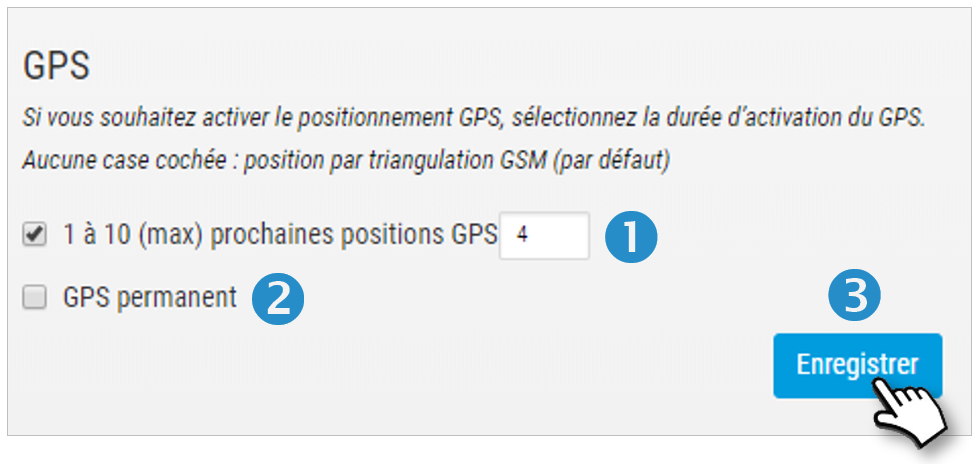
2. Check if you want to receive positions via GPS PERMANENTLY.
Information
This new interval will only be taken into account the next time the beacon connects to the server.
For example: the time of sending the position is 11:00. If you want a position at 12:00 and 15:00 and you make the modification before 12:00, the next position will be at 12:00 the same day. If you make the change at 4pm, the next position will be at 12pm the next day.
3. Don't forget to SAVE your settings.
Tags under surveillance
Identify the locations from which the positions come up (Radio Frequency) (requires the installation and use of additional equipment)
If your activity lends itself to it, you can install a Radio Frequency receiver on one or more sites. The beacons, themselves equipped with an RF signal transmitter, will communicate with the receiver, confirming their presence.
Step 1: Equip your site(s) with RF receiver(s)
You can equip several sites if your goods are likely to circulate between several sites and you want to know on which site they are. Example: shipment tracking.
Step 2: Activate the Tags under surveillance on the platform.
The positions of the beacon that will be retrieved will be identified by this icon:
If the signal is lost, this icon will appear: 
Step 3: Turn on the Echotags' listen and drop alerts.
Was this article helpful?