Settings
- 01 Dec 2021
- Print
- DarkLight
- Download PDF
Settings
- Updated on 01 Dec 2021
- Print
- DarkLight
- Download PDF
Article summary
Did you find this summary helpful?
Thank you for your feedback!
Step management
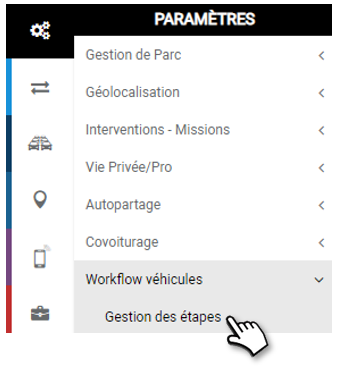
Define the alert periods for each step
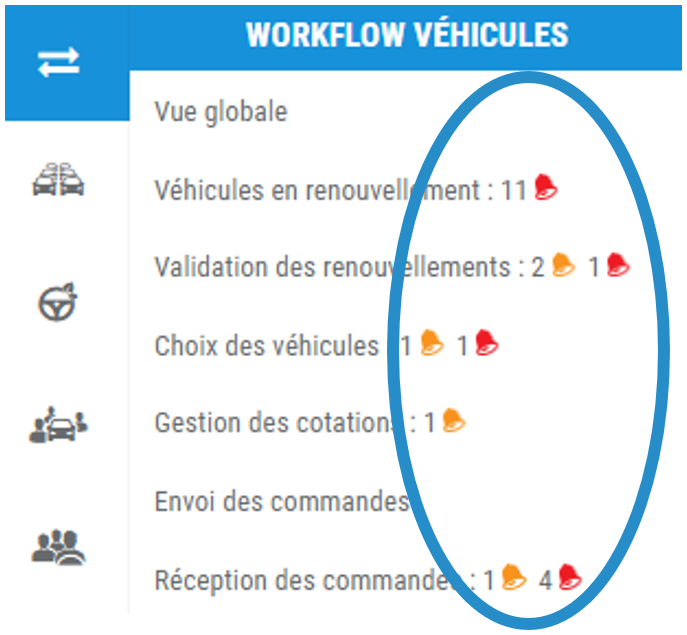
At each step, an orange or red alert warns you when your attention is required as a deadline approaches.
This page allows you to set the alerts visible on the application with the icons  and
and  .
.
Start by defining the period of time that vehicles will enter (be visible) in the workflow application before the current contract ends. This is not an alert, per se, but a renewal entry.
1. Enter the number of days before the end of the current contract. (max: 365 days)
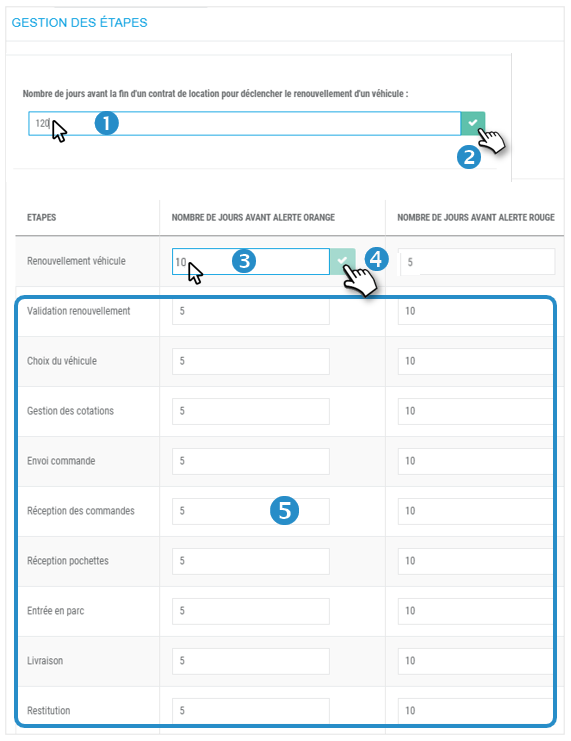
2. Click on  to SAVE your entry.
For example, here the vehicles will be visible in the workflow 120 days before the end of the current contract.
Next, enter the number of days before the renewal date that you want to notify of renewal alerts and .
3. For example, here the alert will be visible 10 days before the end of the current contract and the alert 5 days before the end of the current contract.
4. Click on to SAVE your entry.
All other steps that follow are sequential and depend on the successful completion of the previous step.
5. Enter the number of days after which the alert will turn ORANGE or RED when action is required at this stage (max: 365 days)
Click on to SAVE each entry.
Category management
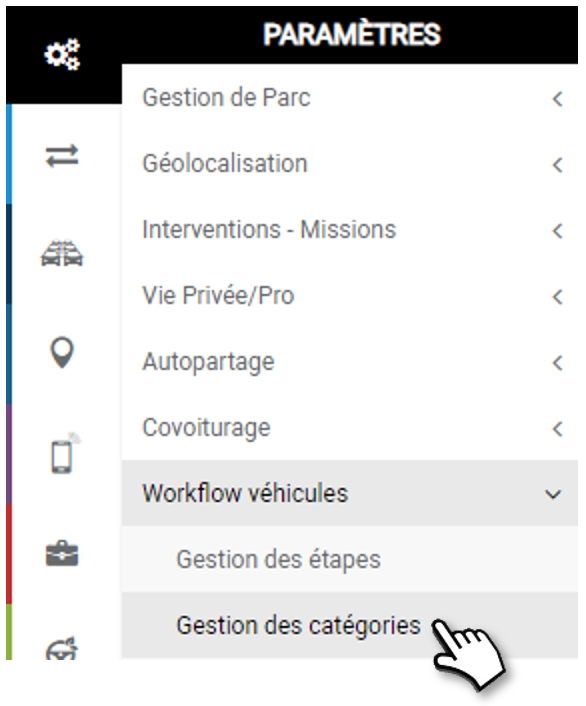
Define and manage categories for your vehicles and drivers
Classify your vehicles and drivers by category.
Organize and create as many vehicle categories as you want according to your internal organization.
Define the categories according to their driving law.
1. Place your cursor on "My Workflow Categories" and click NEW to create a category. Click NEW again and you will create a sub-category, etc.
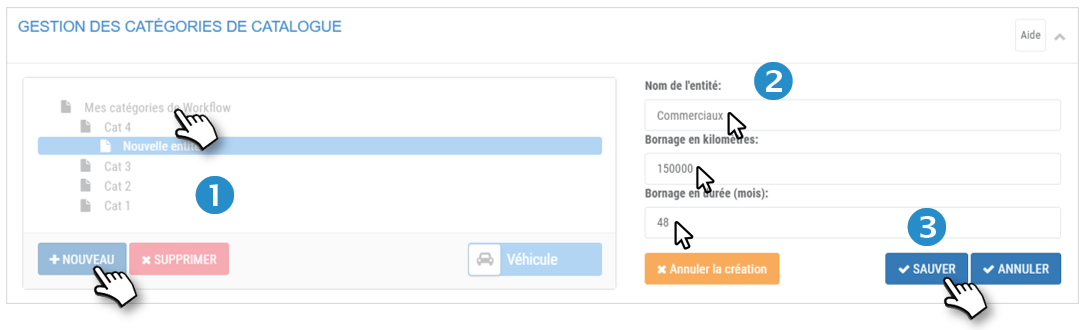
2. Enter a name for this category and fill in the rolling law: mileage and duration (in months).
3. Click on SAVE to SAVE the category
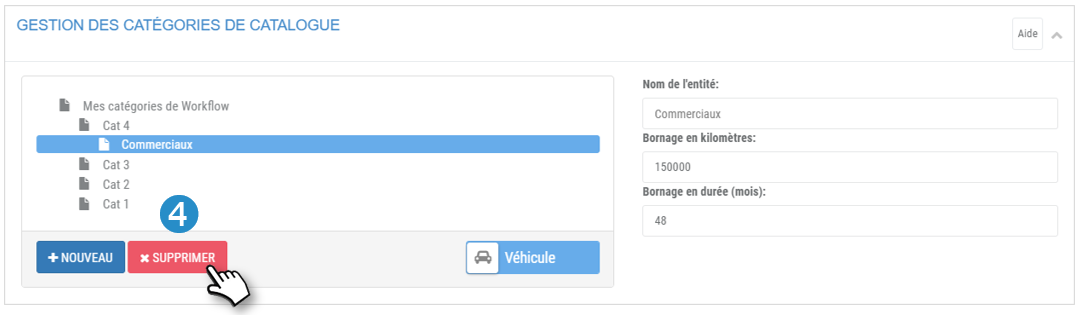
4. When you DELETE a Category that contains Sub-Categories. Only the Category is deleted; the Sub-Categories remain and move up one hierarchical level (e.g. a Sub-Category becomes a Category, etc.).
Tip
You can move a Category into another one by clicking on the Category to be moved and dragging and dropping it into the new Category.
Add vehicle(s) to a category:
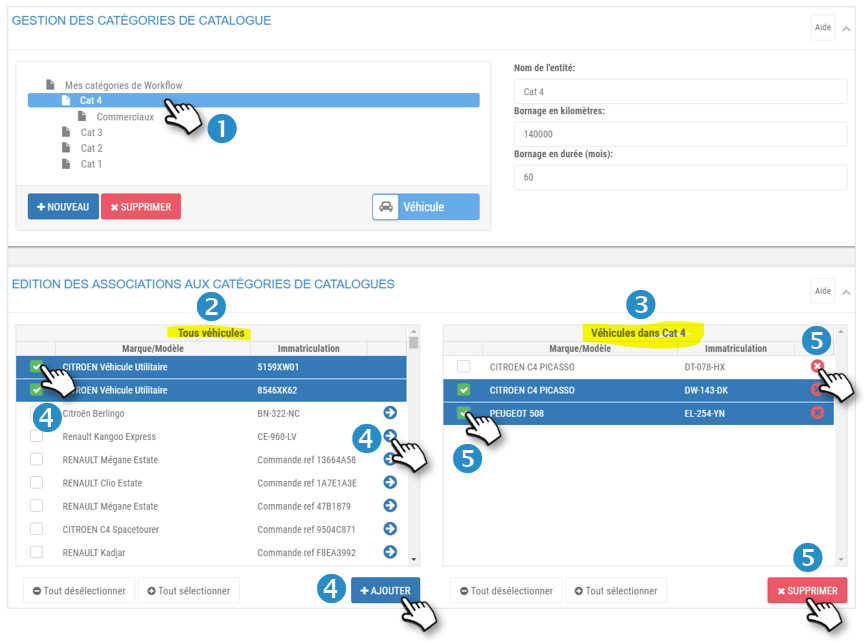
1. Select a category in the tree view.
Two tables are displayed:
2. On the left: the vehicles in the fleet.
3. On the right: the vehicles in the selected Category.
4. In the left column (All vehicles): check the boxes of the concerned vehicles and click on the 'ADD' button or click on the blue arrows of the concerned vehicles.
The vehicles will move from the left column to the right column (IN the category).
No need to validate or SAVE, the action is immediate.
Remove vehicle(s) from a category:
1. Select a category in the tree structure.
2 tables are displayed:
2. On the left: the vehicles in the fleet.
3. On the right: the vehicles in the selected category.
5. In the right column (IN the category): check the vehicles concerned and click on the 'DELETE' button or click on the red crosses of the vehicles concerned.
The vehicles will move from the right column to the left column (All vehicles).
No need to validate or SAVE, the action is immediate.
Switch the display to "Drivers" mode
The drivers will automatically appear in the categories.
Simply move the cursor to DRIVER :
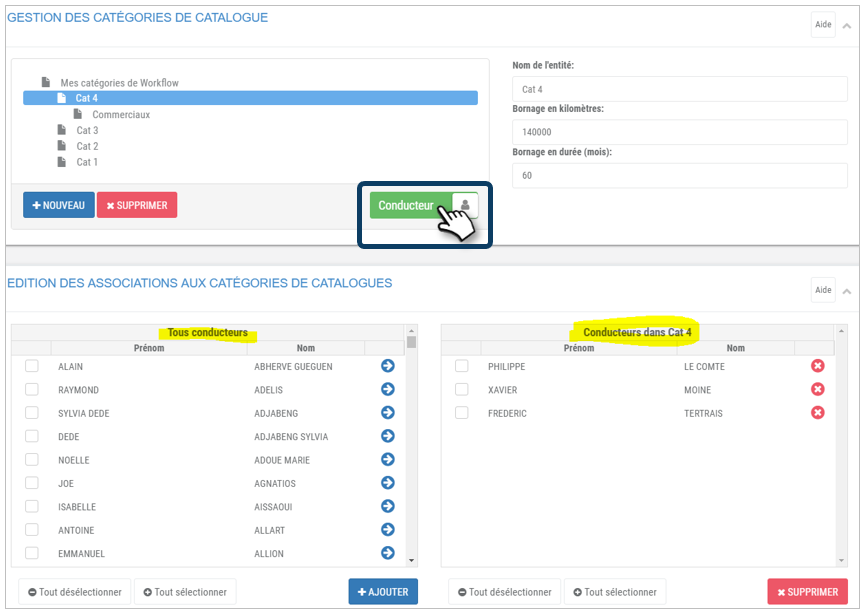
The functionalities are exactly the same as before but displaying the DRIVERS.
Warning
It is imperative to have assigned the vehicles to the drivers beforehand.
Creation of vehicle catalogs
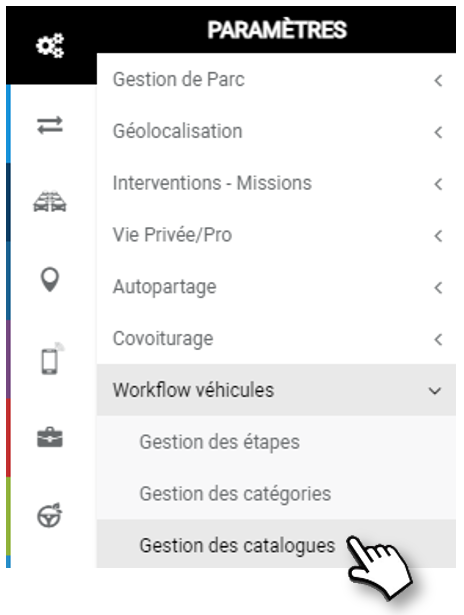
Catalog Features:
Catalogs are lists of vehicles that you select according to your criteria.
Create as many catalogs as you want for the categories you have previously created.
When renewing vehicles, you will select one or more catalogs from which the drivers will choose their vehicle.
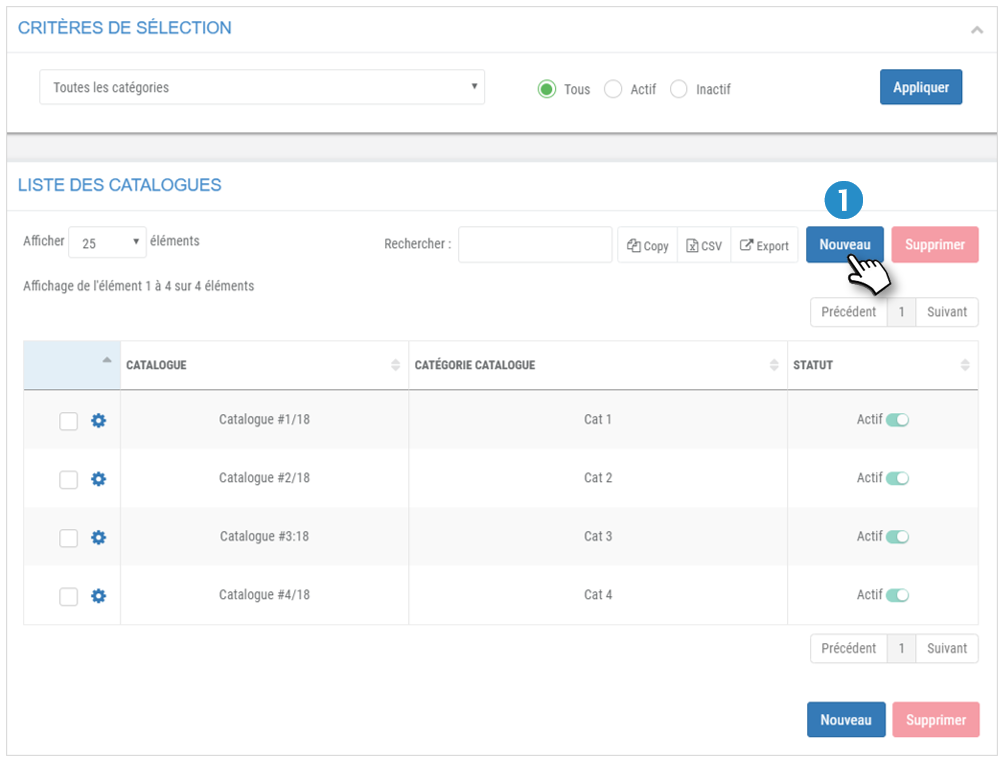
1. Click on NEW to display the input mask for the catalog criteria.
2. Enter a name for this catalog.
3. Select the category to which this catalog applies.
4. Enter a comment or a description of this catalog, if applicable.
5. Enter the driving law: total mileage and duration (in months).
6. Enter the minimum and maximum budget including VAT, with options.
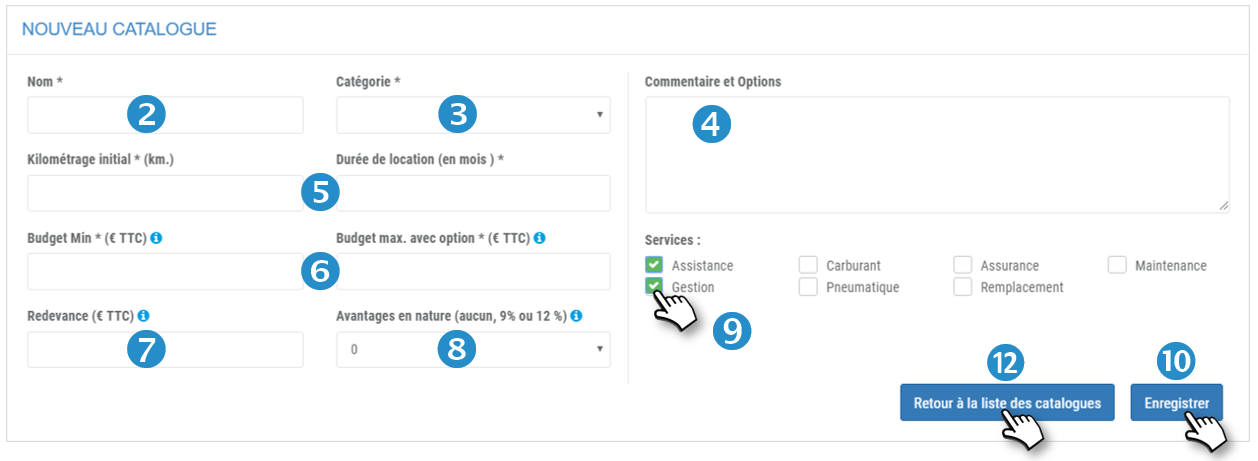
7. Enter the fee, including tax, to be paid by the driver.
8. Select the rate of Benefit in Kind for a company car (0% - 9% without fuel -12% with fuel)
9. Select the services attached to these vehicles within the framework of the rental contract.
10. SAVE the form.
11. A new button has just appeared: ADD VEHICLE. Click to add eligible vehicles to this catalog:

12. Click to return to the list of categories.
Selection of vehicles from the catalog:
Select eligible vehicles from this catalog from all vehicles available on the market. The application is connected to the AUTOVISTA database, the most comprehensive on the market, updated in real time.
1. Click on ADD VEHICLE to display the catalog criteria input mask.
2. Select either PASSENGER (default) or UTILITY vehicle.
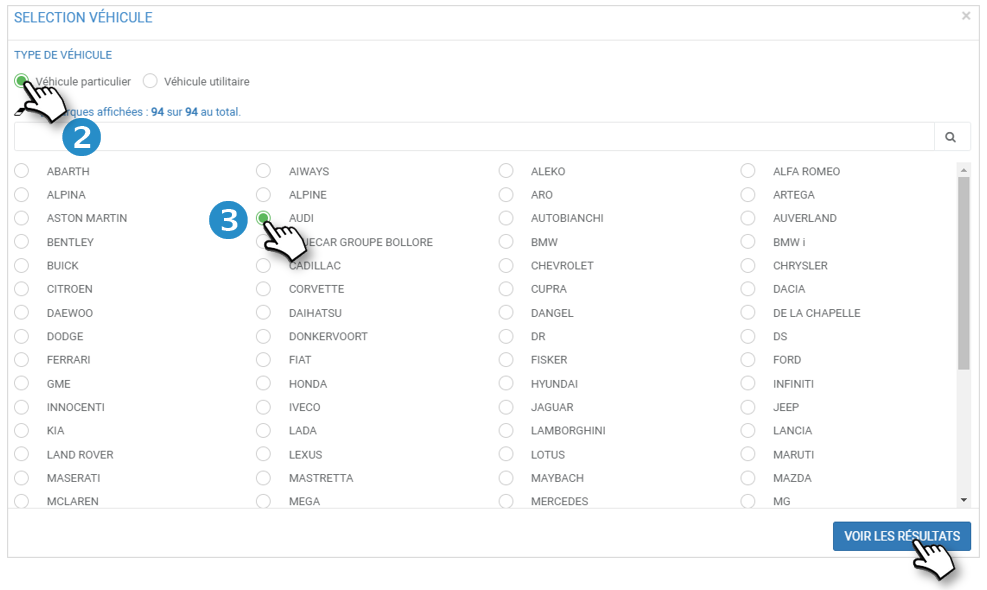
3. Select 1 brand and click on SEE RESULTS.
4. Select one or more models (max 3) and click on NEXT.
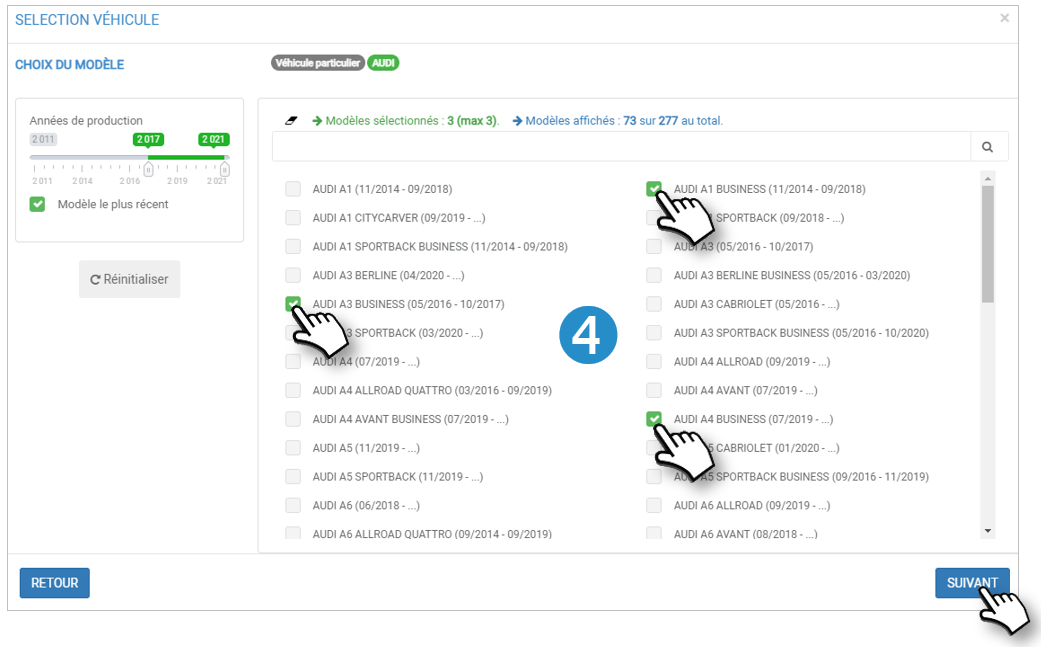
5. The list of ALL VERSIONS of these models is displayed:
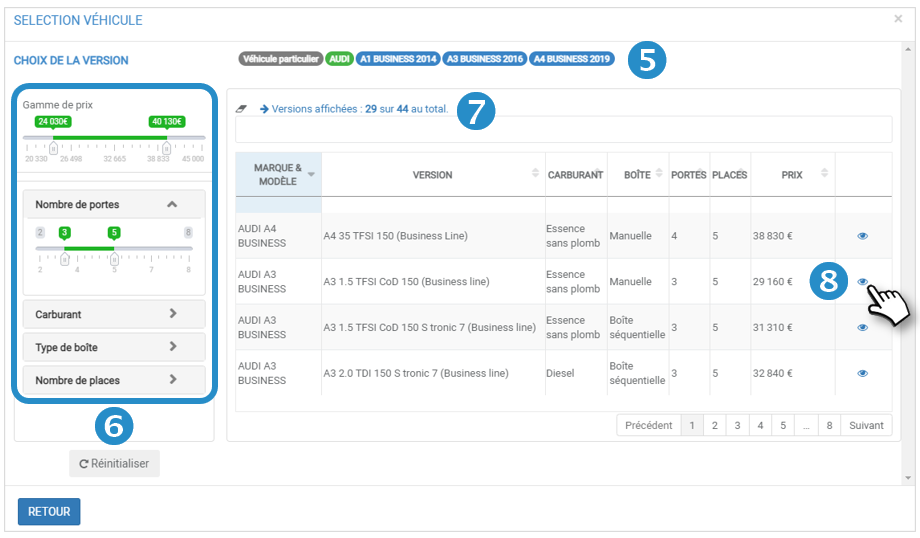
6. You can further filter the selection with criteria on the left of the window: Price, no. of Doors, Fuel, type of Box, no. of Seats.
7. The total number of versions is displayed.
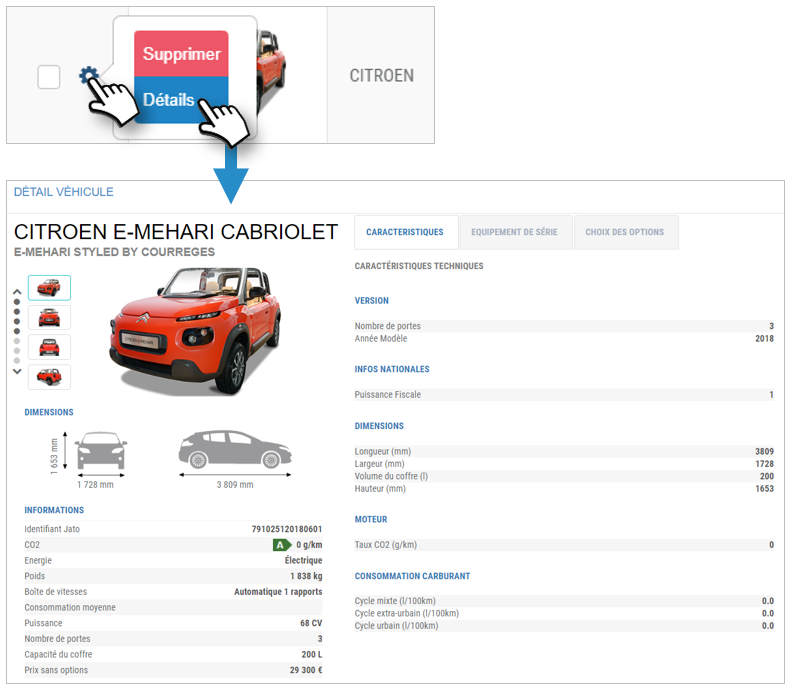
8. Click on to view the detailed vehicle file:
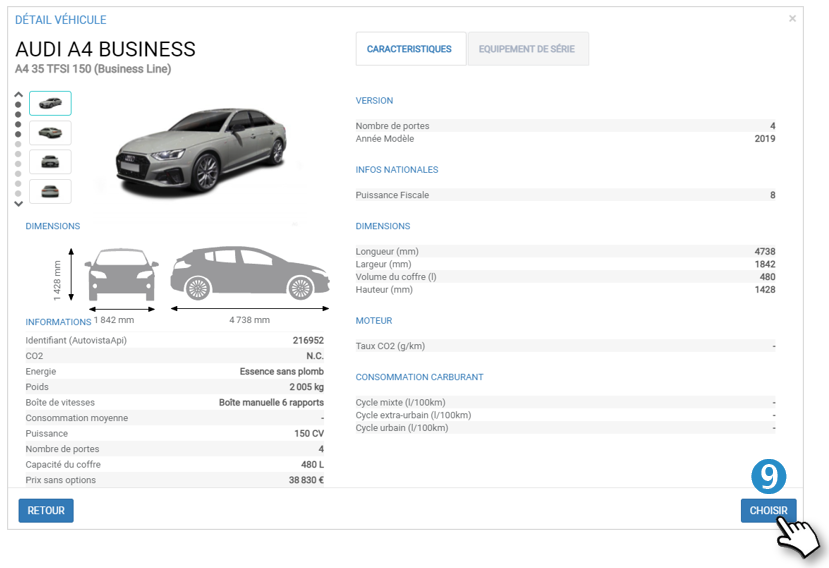
9. Click on CHOOSE to add the vehicle to the catalog or click on BACK to return to the list of models.
Repeat the previous steps to select other vehicles.
Removal of vehicles from the catalog
1. Check one or more boxes. Click on the DELETE button that has appeared.
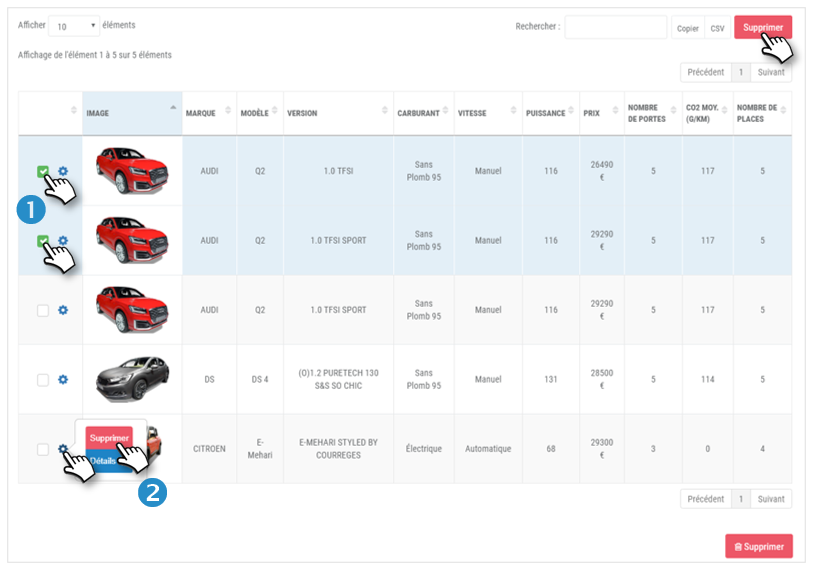
Or :
2. Click on the vehicle icon  and select DELETE.
The vehicle(s) is/are removed from the list.
See the details of a vehicle :
Click on the vehicle icon and select DETAILS.
Supplier management
It is possible to associate one or more suppliers to a vehicle in a catalog. Thus, during the quotation, only the suppliers attached to the vehicle will be proposed.
1. Check one or more boxes. Click on the SUPPLIERS button which has appeared.
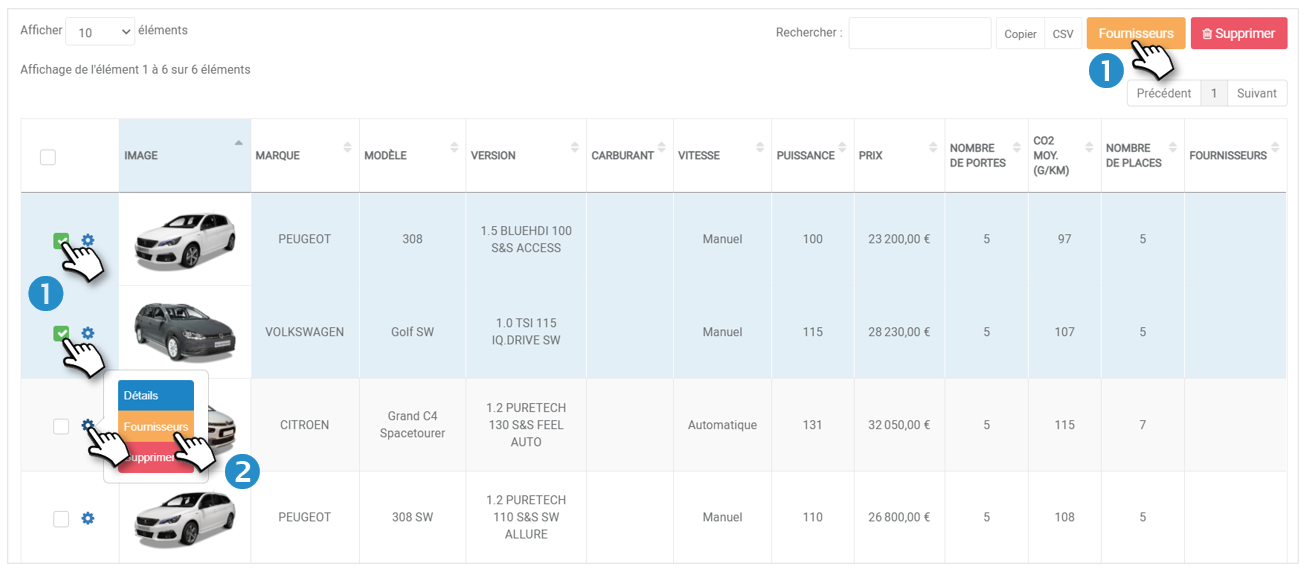
Or :
2. Click on the vehicle icon and select SUPPLIERS .
The supplier settings window opens:
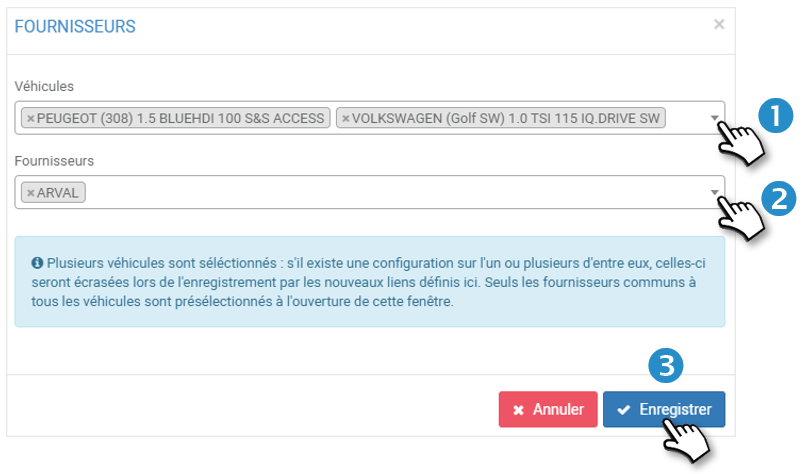
1. Add more vehicles in the drop-down list
2. Select suppliers from the drop down list
3. SAVE
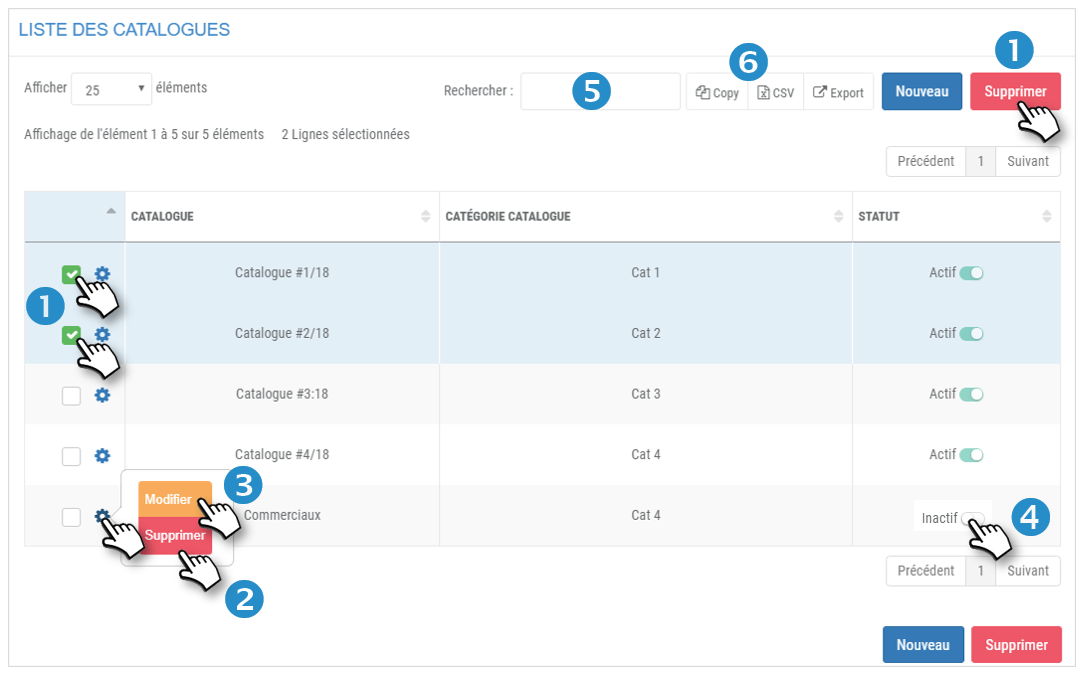
Delete one or more catalog(s) :
1. Check one or more boxes. Click on the DELETE button that appeared.
Or
2. Click on a catalog icon and select DELETE.
The catalog(s) is/are removed from the list.
Editing a catalog :
3. Click on the catalog icon and select EDIT.
There can only be one ACTIVE catalog per category. If you create more than one, only the first one will be active by default.
4. Click on an INACTIVE catalog to make it ACTIVE. In this case the other catalog(s) in that category will become inactive.
5. You can search by keyword by entering the beginning of the catalog you are looking for.
6. You can copy the content of the table or export it in .csv format.
Validator management
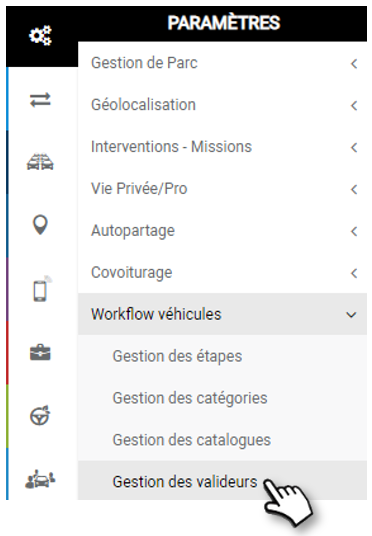
The operation consists of designating a Validator and assigning him/her a role (for the moment, only "Renewal Validation") for one or several Assignment Centers.
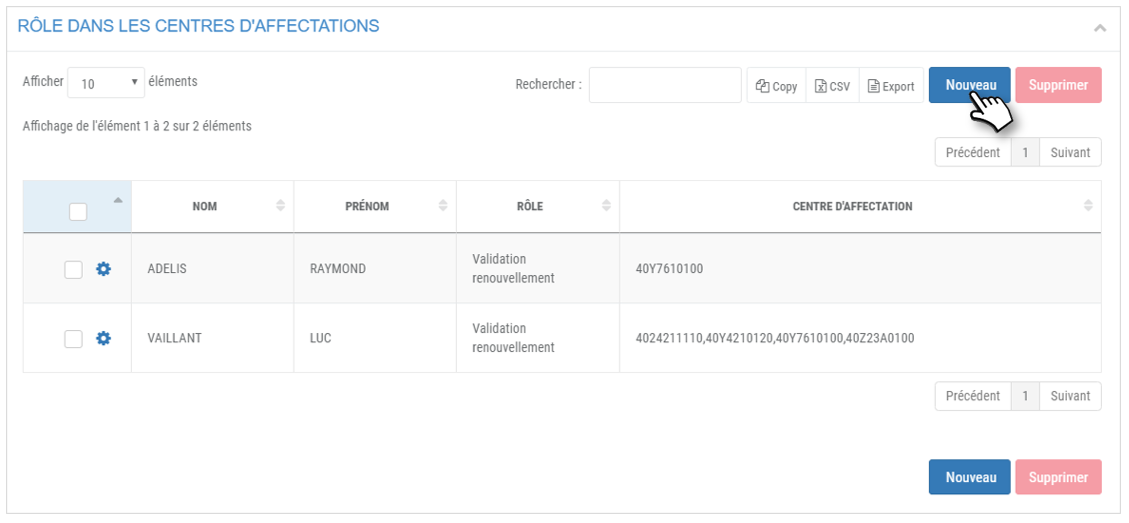
1. Click on NEW
2. Select one or more collaborators.
3. Role: renewal validation (default).
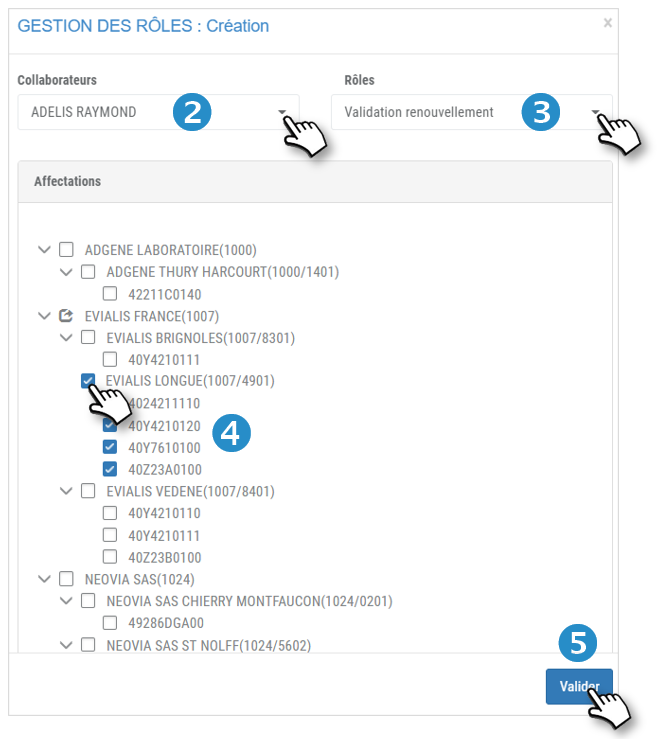
4. Select an assignment center(s)
5. Do not forget to VALIDATE.
6. The Validator(s) is/are added to the list.
Filter the Roles table:
1. Select one or more collaborators and/or one or more assignment centers
2. Click on APPLY
3. The result appears in the table below.
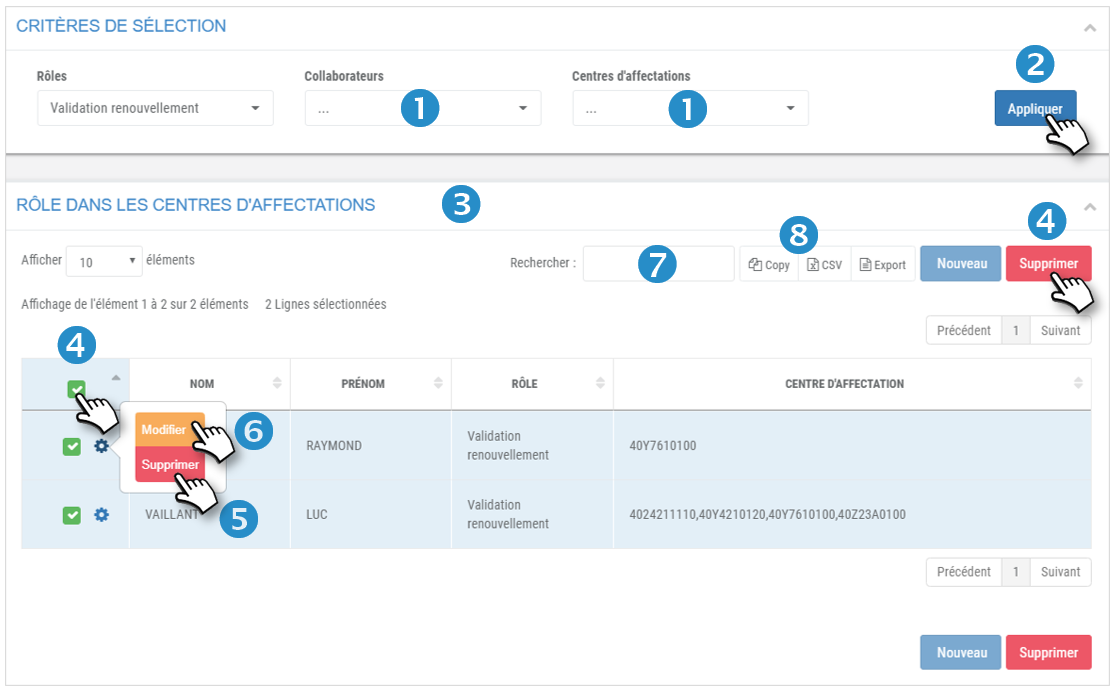
Delete one or more validators:
4. Check one or more boxes. Click on the DELETE button that appeared.
Or :
5. Click on the validator icon and select DELETE.
The validator(s) is/are removed from the list.
Modify a validator :
6. Click on the validator icon and select EDIT.
7. You can search by keyword by entering the beginning of the catalog you are looking for.
8. You can copy the content of the table or export it in .csv format.
Was this article helpful?